Today I would like to share with you all on how we can use AX2012 to plan the detailed project activities more efficiently and transfer these estimates while planning project forecasts or project budgets to have more effective control on the project expenditures and revenues.
Steps to configure into AX2012 R3:
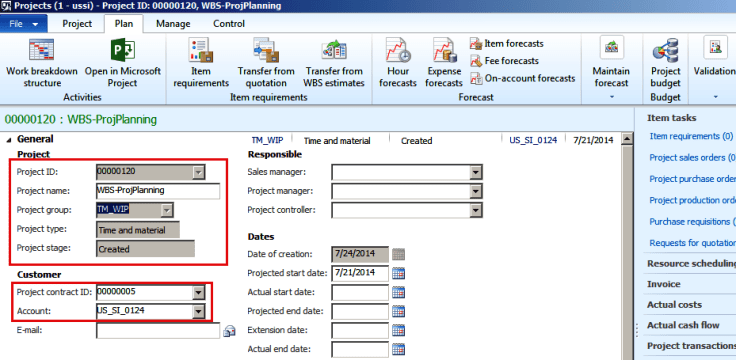
Create your project (T&M or FP) with all required details like project group, project contract, project name etc.. from Project management and accounting=> Common=> Project=> All projects.
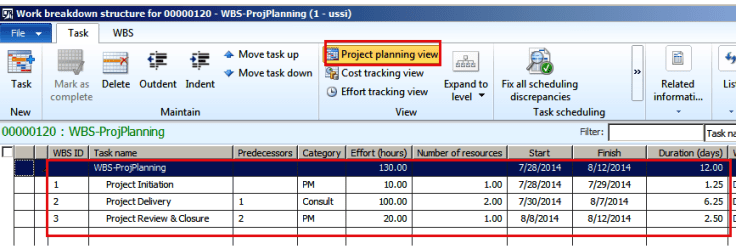
Define the list of project activities on work breakdown structure form opened using project details Plan tab Work Breakdown Structure button.
Specify the effort required for these activities, number of resources working on these tasks, cost category for the tasks and dependencies if any as a part of project planning view.
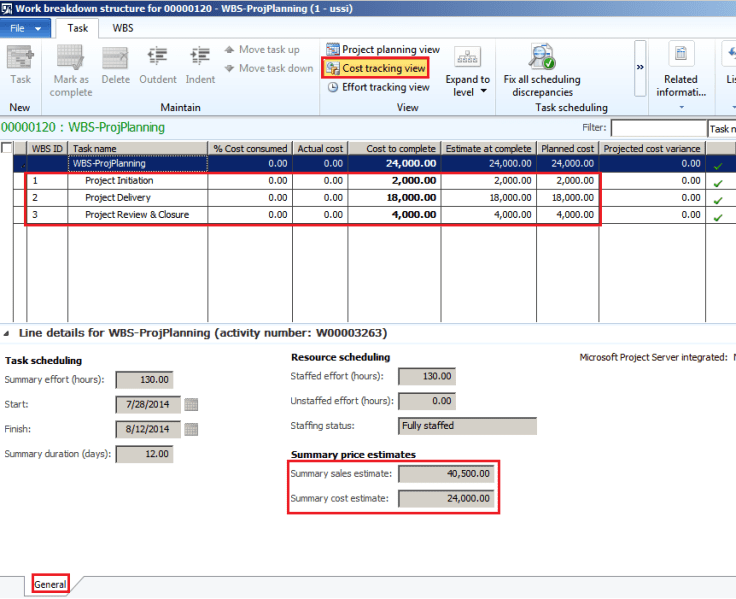
Observe the cost being computed for the project tasks individually and add up to the main project in the cost tracking view.
Note both the estimated cost ($24,000) and revenue ($40,500) amounts for the project activities individually and in total for the whole project.
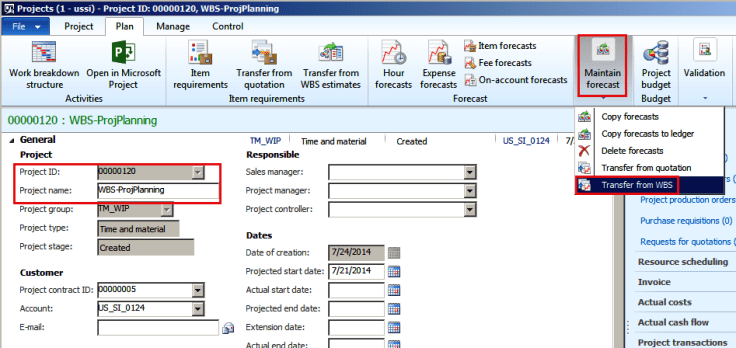
Now while planning the project forecasts we can include these estimated costs and revenues in the forecast lines. Use Maintain forecast=> Transfer from WBS button on the Plan tab to load the planned estimates from project WBS.
We can select specific transaction types to load in the Transfer from WBS engine or choose All. Mark all or the specific estimated lines, specify a forecast model and hit OK. Here we can also schedule this transfer through Batch processing.
Once we do that, all selected lines from Transfer from WBS engine will be loaded successfully to the project forecasts.
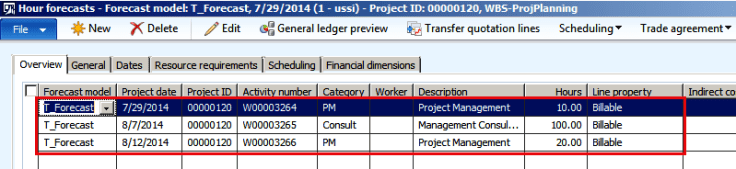
To view them use Forecast section on the Plan tab of project details form. As we have hour categories mapped on WBS estimates so we can check the created hour forecast transaction lines using Hour forecasts button. This will copy the respective activity number, category, effort in hours and price details from the WBS estimate.
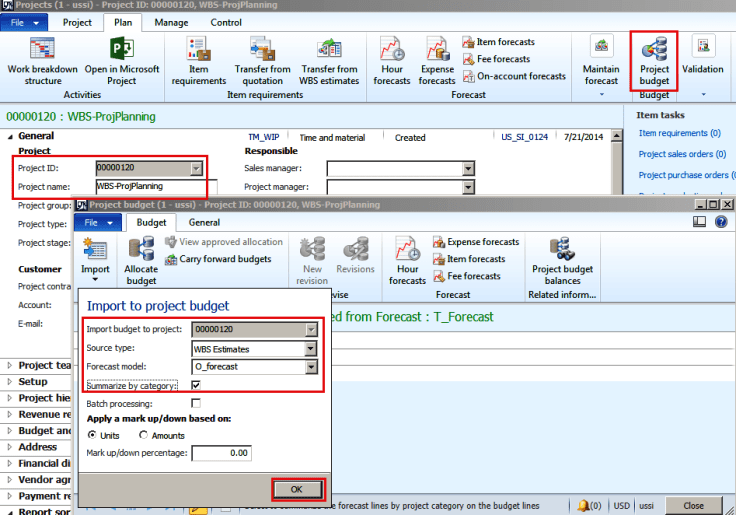
We can also import these WBS estimates to plan the project budget. To do this click on button Project budget from project details form.
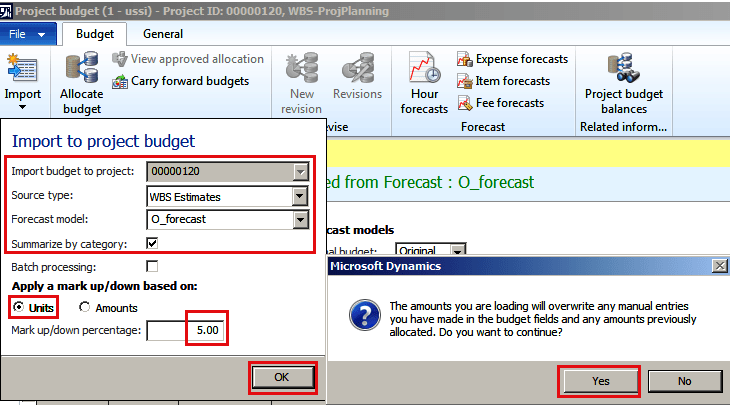
Click on Import button, specify Source type= WBS Estimates, Forecast model= O_forecastor any other original budget forecast model, mark field Summarize by category to summarize budget lines based on category and click OK button.
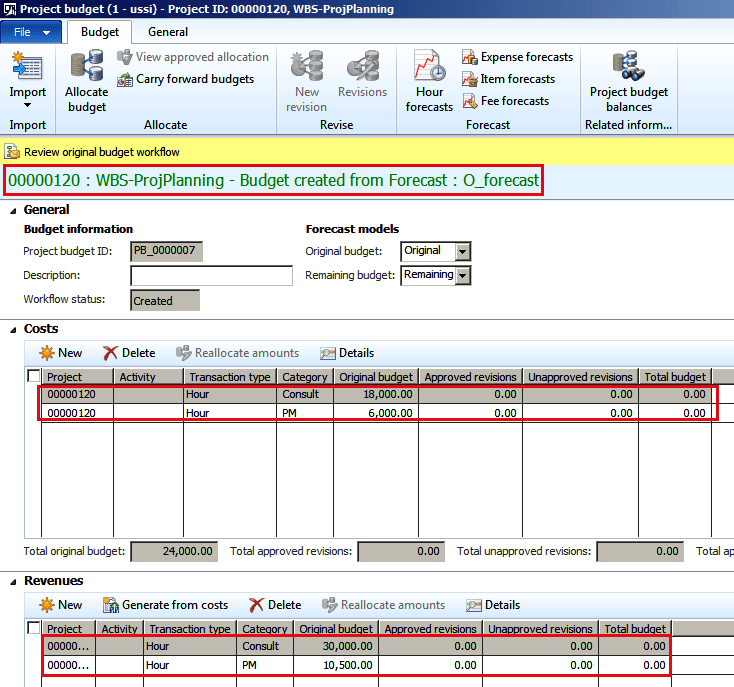
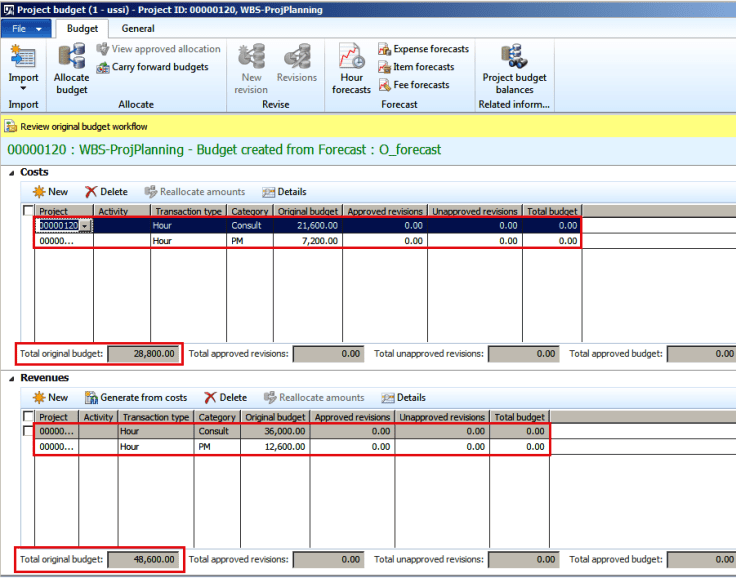
Observe that the WBS estimate lines summarized by category are successfully loaded into costs and revenue budget lines with correct amounts.
Total cost budget= $24,000, Total sales budget= $40,500.
We can also add up mark up/down percentage units or amounts on top of these estimated cost and revenue budget lines and include for planning. The differentiation of mark up/down percentage is basically provided by the positive or negative amounts or units specified.
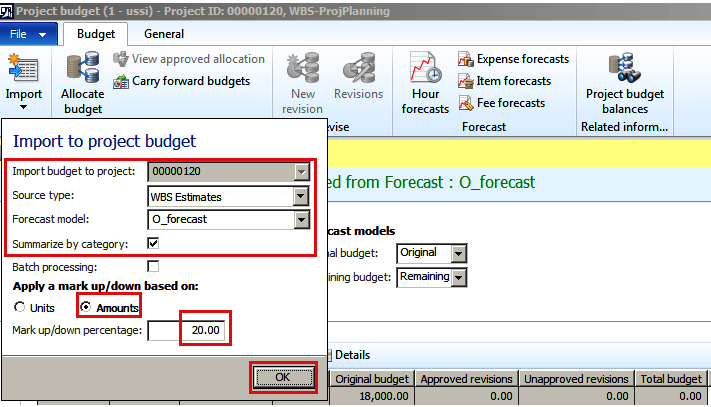
Click Import button and specify criteria same as previous import, except Apply mark up/down based on: Amount and 20% mark up percentage on WBS estimate lines. Click Yes to overwrite the previous imported lines.
Now observe the budget lines created for Costs and Revenues. They have additional 20% mark up amounts on top of the WBS estimated amounts for the lines.
Total cost budget= $24,000 (WBS estimated cost) + 20% (markup amount which is $4800) = $28,800.
Total sales budget= $40,500 (WBS estimated cost) + 20% (markup amount which is $8100) = $48,600.
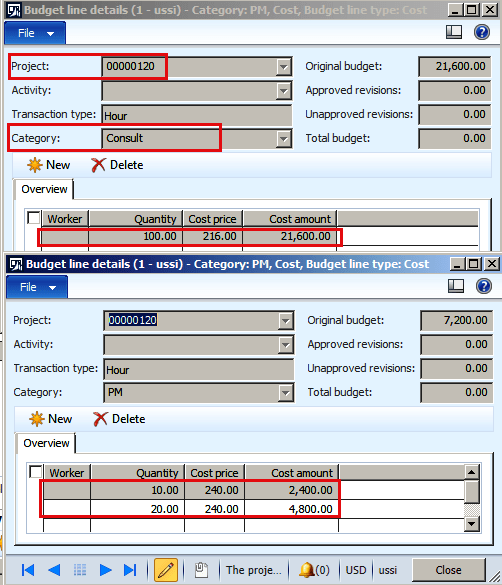
We can also view the detailed budget lines and observe that cost price and sales price amounts are re-calculated with additional 20% markup here as well.
Similarly we can choose to apply mark up percentage based on Units and import into budget lines. Here let us choose 5% mark up units.
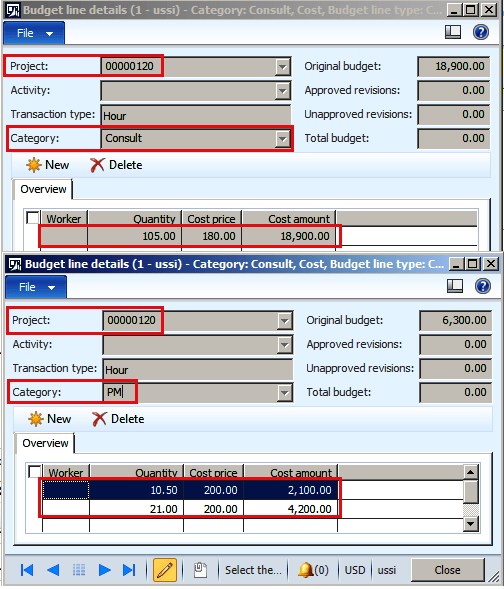
Observe that the created budget lines have additional 5% units on top of WBS estimated lines.
The total quantity for budget lines gets increased by 5% for each category line and multiplied with standard cost price & sales price amounts defined in the system as shown below.
This topic provides information about project resourcing.
One challenge for project managers and resource managers during the project planning stage is resource allocation, where they must determine and reserve the correct resource to work on a project. In Microsoft Dynamics 365 for Finance and Operations, resourcing capabilities for projects let you define roles that are treated as temporary resources that can be reserved for a specific engagement or part of an engagement. This type of resourcing lets project managers and resource managers complete the following tasks:
Define a role that has the required competencies, so that it’s easy to match resources.
Use roles to define an initial engagement schedule that is based on reserved resources.
Estimate costs and determine an initial budget, based on assigned roles and resources for a project.
Use roles to estimate the number of resource reservations that are required for each engagement.
Estimate the number of resources that are required for the whole life cycle of a project.
Draft a work breakdown structure (WBS) by using the initial resource assignments.
As project planning proceeds, planned resources can be replaced with staffed resources. The project manager can also go back and update the resourcing reservations during any project stage.
Set up project resources
You must set up a calendar and associate it with an employee or a worker. The calendar is used to schedule the project and the working time of the resources that are reserved for the project. During calendar setup, project managers can do resource leveling as part of resource optimization. Based on the calendar schedule, restrictions can be put on resources. You can set up a calendar on the Calendars page.
When you set up a worker as a project resource, you can select from workers who work in the company that you’re setting up resources for. Alternatively, you can select workers from other companies in your organization. These workers are known as intercompany resources.
The following procedures explain how to set up a worker as a project resource in your company and how to set up an intercompany project resource.
Set up a worker as a project resource
On the Workers page, in the Workers list, select the worker that you’re adding as a project resource, and open the worker record.
On the Action Pane, select Project > Setup > Project setup.
Select a calendar, and then close the page.
You can also specify default projects for a resource as a type of pre-assignment. Pre-assignments can be used when the resource manager or project manager knows which projects the resource will be working on in advance. Pre-assignments can also be based on the request of a project sponsor or customer. To pre-assign a project, on the Assign projects page, on the Projects tab, in the Remaining projects list, select the appropriate project.
Set up an intercompany resource
When you set up a worker as an intercompany resource, you must complete the setup in both the lending company and the borrowing company.
In the lending company
In Finance and Operations, verify that the lending company is selected, and then complete the procedure in the previous section, “Set up a worker as a project resource.”
On the Intercompany accounting page, select New.
In the Legal entity ID field, select the lending company. Fill in the remaining fields as appropriate, and then select Save.
On the Transfer price page, select New.
In the Borrowing legal entity field, select the appropriate company.
To lend the borrowing company only the resource that you created at the beginning of this section, in the Resource field, select the name of the resource that you created. To make all resources in the lending company available to the borrowing company, leave the Resource field blank.
On the Project management and accounting parameters page, on the Intercompany tab, set the Enable intercompany resource scheduling and timesheets option to Yes.
In the borrowing company
On the Resources list page, in the search filter, enter the name of the resource that you created for the lending company, to verify that the name is included in the resource list for the borrowing company.
Manage resource competencies
Resource competencies are an essential part of resource management. Competencies can be used as a baseline to determine resources that have the correct balance of skills, education, certification, and project experience. You should set up this information for each resource and update it on a regular basis. In this way, you can maximize capabilities when specific resource competencies are matched during project resource assignment.
The following procedures explain how to set up some of the competencies for a resource.
To set up competencies for a worker, you can use either the Workers list page in Human resources or the Resources list page in Project management and accounting. For the following procedures, the Workers list page in Human resources is used.
Set up competencies: Certificates
On the Workers list page, select the line for the worker to add certificate information for.
On the Action Pane, on the Worker tab, in the Competencies group, select Certificates.
Select New, and then, in the Certificate type field, select PMP.
In the Start date field, select 10/1/2015, and select Save.
Set up competencies: Skills
On the Workers list page, make sure that the worker that you used in the previous procedure is still selected. Then, on the Action Pane, on the Worker tab, in the Competencies group, select Skills.
Select New.
In the Skill field, select Project management.
In the Level field, select 5 Expert.
In the Level date field, select 1-/14/2014.
In the Years of experience field, enter 10.
Select Save, and then close the page.
Create a new project
On the Project management page, select New project, and enter the following values:
Project type: Time and material
Project name: XYZ Upgrade Phase 2
Project group: TM_WIP
Project contract ID: 00000002
Select Create project.
Assign a resource to a project
On the Workers page, in the Workers list, select the record for the worker that you previously set up competencies for, and open the worker record.
On the Action Pane, on the Project tab, in the Setup group, select Assign projects.
On the Resource validation project assignments page, on the Projects tab, in the Add the project to selected projects field, filter on the XYZ Upgrade Phase 2 project.
In the Remaining projects pane, select a project, and then select the arrow button to add it to the Selected projects pane.
You can also assign categories for a resource as you require. The category type is either Cost or Revenue. The category type is determined by your organization. If no categories are assigned for a resource, Finance and Operations looks up the default category on hour prices for cost and revenue.
Set up project resource and role characteristics
A project manager can use the project resourcing functionality to create the roles that are required for the project. Roles can be used if confirmed resources are still unknown when resources are being reserved. Roles can be temporarily reserved as planned resources, so that you can continue the project planning stages.
Scenario: Contoso was hired to complete a Time and material project that has an approved project charter. The junior project manager is still completing the scope of the project. The resource manager is currently identifying specific resources that will be reserved to work on the new project. Because of the critical nature of the project, the project sponsor requested Senior project manager as one of the roles. The resource manager must acquire the new resource and define the role in the system in case the junior project manager requires the resource information during project planning.
The following steps show how the resource manager can set up the Senior project manager role and associate resource characteristics with it. Later, the role can be used to search for available resources that match the required resource competencies.
On the Setup roles page, select New, and enter the following values:
Role ID: Senior Project Manager
Description: Senior Project Manager
Select Create.
Select the Senior Project Manager role, and then select Configure characteristics.
In the Characteristics type field, select Skill.
In the Available characteristics field, enter the skill to search for.
In the Characteristic type field, select Certificate.
In the Available characteristics field, enter the certificate type to search for.
Assign a project resource to a project
On the All projects page, select the XYZ Upgrade Phase 2 project.
On the Project team and scheduling tab, select Add.
In the Role field, select Team member.
Select Book from calendar.
On the Resource availability page, select View settings.
On the Adjust view settings page, enter the following values:
Format for date range view: Day
Display availability descriptions: Yes
Display remaining capacity: Yes
In the list of resources, select a resource.
Select Hard book and Full capacity.
Assign a resource to a default role
To help project or resource managers can drill down further on the resources that can be reserved for a project. You can associate a default role with an existing resource or a newly acquired resource. For example, when Daniel was hired, he had the experience and skills to fill the Business analyst role. The resource manager assigned this role as Daniel’s default role. Therefore, the resource manager added Daniel to a pool of business analysts who are available to work on projects.
During resource reservation, project managers can filter the role resources that are available to work on projects. They can use this information as one criterion when they perform multi-criteria decision analysis during resource fulfillment. They can also add other resource characteristics to the filter to search for resources that have specific skills, education, and experience for a given project.
Scenario: An approved project has started, and the Senior project manager role was reserved as a planned resource during the project planning stage. The resource manager has now acquired a resource to fulfill the Senior project manager role.
On the Resources list page, select Daniel Goldschmidt.
On the Resource role page, select New, and enter the following values:
Effective: Enter the current date.
Expiration: Enter Never.
Role: Enter Senior Project Manager.
Select Save, and then close the page.
On the Competencies tab, add the ProjectMgmt skill and the PMP certificate.
Set up role-based pricing
All cost, sales, and transfer prices can be set up for roles.
On the Sales price (hour) page, select New, and enter an effective date.
In the Role column, select a role.
In the Pricing column, enter a price for the selected resource role.
Form a project team
To use the roles that were previously set up in a project, a project manager must associate the roles with the project. Multiple roles can be assigned for a project. To prevent confusion, Finance and Operations automatically labels these roles during reservation. For example, if the project manager requires three software engineers, three Software engineer roles that have software engineer 1, software engineer 2, and software engineer 3 as their labels are automatically generated. If role characteristics were previously set for the role, they are applied as a filter during searches for a resource. Additional characteristics can be added as required to further refine the search.
View settings can also be customized to give a better view of resource availability. There are options to show hourly, daily, weekly, monthly, quarterly, and annual availability. There is also an option to show available and remaining capacity on resources. This option is useful for time management, when you’re estimating available time for activities or resource availability.
The project manager can select a role on the page and then, if there is an available resource that fits the requirement, select to reserve a resource to fill the role. Note that the resources don’t have to be reserved at this point in the planning stage. When you create a WBS, you can replace roles with staffed resources for the project. If roles are replaced with staffed resources in the WBS, the resource setup automatically updates the project team listing and scheduling.
The project manager has various options for booking a resource for a project, such as Remaining capacity, Full capacity, Capacity percentage, and Specify hours. These booking options can be canceled at any time if resource assignments change. Two types of booking are supported:
Hard Book – The resource reservation was approved and confirmed to work on the engagement for the specified duration.
Soft book – The resource reservations was tentatively set to work on the engagement for the specified duration.
The following procedure explains how to create a project team.
Create a project team
On the All projects list page, select a project, and then select Edit.
On the Project team and scheduling tab, in the Schedule end date field, enter the schedule start date plus one month. For example, if the schedule start date is June 24, 2017 (24/06/2017), enter 24/07/2017.
Select Add.
In the Add roles to the project pane, in the Role field, select Senior Project Manager.
Select Required competencies.
On the Choose characteristics page, the characteristics that you previously set for the Senior project manager role are selected by default. Select OK.
On the Add roles to project page, in the Number of resources field, enter 1.
In the Resource field, the lookup shows all resources that have the required competencies. Select Daniel Goldschmidt, and then select Create.
On the Project page, select Add.
In the Add roles to the project pane, in the Role field, select Team member. In the Number of resources field, enter 5.
Select Create.
On the Projects page, select Fulfill resource.
Resource capacity synchronization
The processes for resource synchronization help guarantee that information for the calendar and base calendar trickles down into project resource scheduling. If the calendar is changed, the processes make the required updates to the scheduling of project resources. The processes also help improve performance, because the calendar’s resource information is synchronized in advance. Therefore, updates to resource scheduling information occur more quickly. We recommend that you schedule the processes as a batch instead of one at a time. Otherwise, there is a risk that someone will forget the inclusive dates when the information was last synchronized. If inclusive dates aren’t used, gaps can occur during date synchronization.
Synchronize resource capacity roll-ups
The synchronization process is designed to synchronize all resource calendar information. This information includes base calendar information about any changes to the project’s Resource calendar capacity table. If new resources are added in the project, synchronization helps guarantee that the updated calendar information is available. This synchronization can be done at any time.
We recommend that you use a batch. The options are available during synchronization of capacity reservations.
Optionally select the General ledger date interval code to set the start and end dates for the synchronization process for resource capacity roll-ups.
Start date
Enter the start date for the synchronization process for resource capacity roll-ups.
End date
Enter the end date for the synchronization process for resource capacity roll-ups.
Set up roles on WBS templates
Project managers can set up WBS templates that they can apply when they create a WBS for new projects. Project managers can add roles when they create a template. Use the following procedure to assign a role to a WBS template.
Select Project management and accounting > Setup > Projects > Work breakdown structure templates.
Select Details for a selected WBS template.
Select a task in the list, and then, in the Role field, select a role to assign to the task.
Work with a WBS
You can create a new WBS, or you can copy a WBS from an existing WBS template. A project manager can easily manage the resources by assigning roles to new tasks on the WBS. Roles can be replaced either after a resource is acquired or after a confirmed resource to work on the task is identified. This flexibility lets project managers perform the following tasks:
Identify the number of resources that are required for WBS work packages.
Estimate project costs.
Determine a preliminary budget.
Estimate activity duration, based on roles and resources.
Develop some project management plans, based on the available project information.
Additional options have been added in the WBS to better use the resourcing functionality.
Option
Description
Resource assignments
View the assigned resources, dates, number of hours, and booking type for tasks on the WBS.
Auto generate team
Automatically add planned resources by using roles that are associated with a task. Finance and Operations automatically suggests planned resources by using multi-criteria decision analysis that is based on roles. After the roles and effort (hours) have been set for the tasks in a WBS, and after the structure has been released, select Auto generate team. The required number of planned resources is added to the WBS and the Project and team scheduling tab.
Resource (drop-down list)
On the Launch resource assignment page, you can select resources to hard-book or soft-book, based on the specified duration. You can adjust the view settings to see and set the duration of resource activities. You can select and assign resources at the work package level by using the following options: Accept – Confirm changes to the resource that is assigned to a task.Cancel – Cancel changes to the resource that is assigned to a task.Assign automatically – An available staffed resource that has a matching role is automatically selected and assigned to the selected task.
On the All projects page, select the XYZ Upgrade Phase 2 project.
Select Plan > Activities > Work breakdown structure.
Select New to add the following level-one activities to the WBS:
Initiating
Planning
Executing
Monitoring and Control
Close
Set the dates and effort (hours), as shown in the following illustration.
Select the Initiating task line, and then, in the Role field, select Senior Project Manager.
Select Publish.
On the same line, in the Resource field, select Daniel Goldschmidt, and then select Accept.
Select the Planning task line, and then, in the Role field, select Business analyst.
Select Publish, and then select Auto generate team.
In the message box that appears, select Yes.
In the Resource field, verify that the value is Business analyst 1.
For the Business analyst 1 resource, open the lookup, and select Launch resource assignments. Then select a worker for the task.
Select Soft assign > Full capacity. Note You don’t receive a warning that the specified resource is now 2, because the number of resources remains 1.
On the Work breakdown structure page, validate the resource assignment on the WBS, and then select Save.
Resource fulfillment for planned resources
A project manager can plan required resource roles for a project. The resource manager will see these planned resources as requests on the Resource fulfillment page and can assign actual resources.
On the All projects page, select the XYZ Upgrade Phase 2 project.
Select Project, and then select Edit.
On the Project team and scheduling tab, select Add.
In the Add roles dialog box, select the Software developer role.
Select Create, and then close the project page.
On the Resource fulfillment page, select Software developer 1 for the XYZ Upgrade project Phase 2 project.
Select a worker, and then select Assign.
Verify that the line for Software developer 1 has been removed for the XYZ Upgrade project Phase 2 project.
On the Project team and scheduling tab, for the XYZ Upgrade Phase 2 project, verify that the worker that you selected in the previous step has been added as Software developer.
Requests for project resources
The functionality for project resource scheduling only lets resource managers distribute staffed resources on engagements or projects. To enable this functionality, complete the following tasks, or verify that they have been completed:
Set up number sequences.
Set up project management and accounting workflows.
Enable resource request workflows.
After the preceding tasks have been completed, you can complete the following tasks as you require:
Create a resource request from a soft-booked staffed resource.
Monitor resource requests.
Fulfill resource requests.
Request a staffed resource from a WBS.
Book resources to a project without having a request for a staffed resource.
Monitor project teams
On the All projects page, select the Project ID link for the XYZ Upgrade Phase 2 project.
On the Project team and scheduling FastTab, verify that the project resources that are listed are correct.
Replenishing items in picking locations from bulk locations in warehouses is a regular practice in distribution based industries. Microsoft D365 SCM has out-of-box warehouse replenishment features that support both Demand and Minimum/Maximum based replenishments.
This blog article covers some typical warehouse scenarios related to Minimum/Maximum replenishments. Please note I am only covering up until Work creation as this is core for replenishment.
Items in bulk locations can be stored in multiple locations in different quantities. In this context, there are these common requirements:
Microsoft Dynamics AX ensures that replenishment Work is created to pick from the closest bulk location.
If the replenishment quantity for a Picking location can be satisfied by multiple bulk locations, how to setup Replenishment so that the Work is created to pick from multiple Bulk locations.
Staging replenishment items.
First, let us look at the replenishment Work to be created to pick up from the closest bulk location. Since Microsoft Dynamics AX does this by default, I am providing all the setups needed for Minimum/Maximum based replenishment.
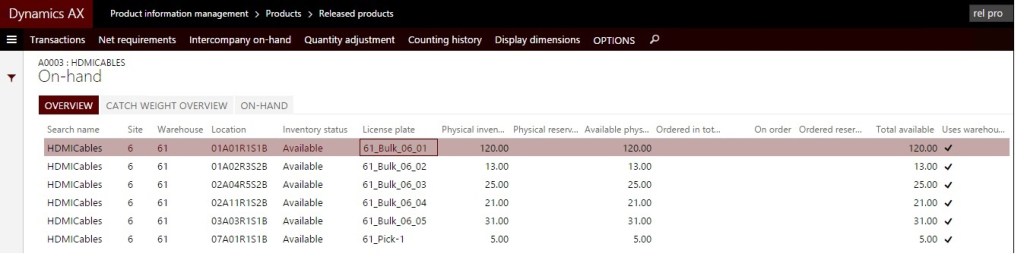
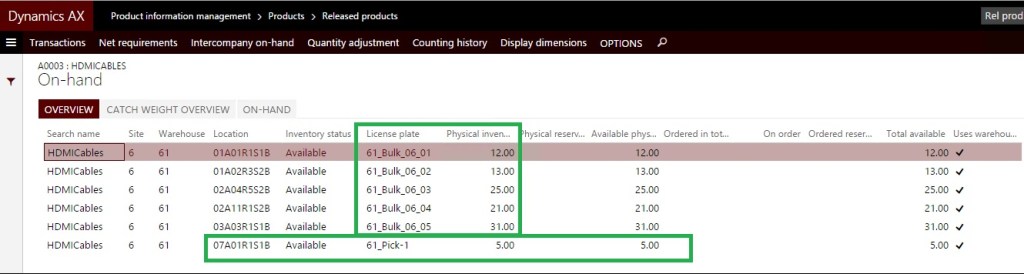
Current on-hand situation
Here’s the current on-hand quantities in Warehouse 61 for item number A0003. Take a look at the Locations. These are all Bulk locations with location format as ##Aisle##Rack#Shelf#Bin. 01A01R1S1B, the first location in below screenshot, is the closest location to the Picking locations.
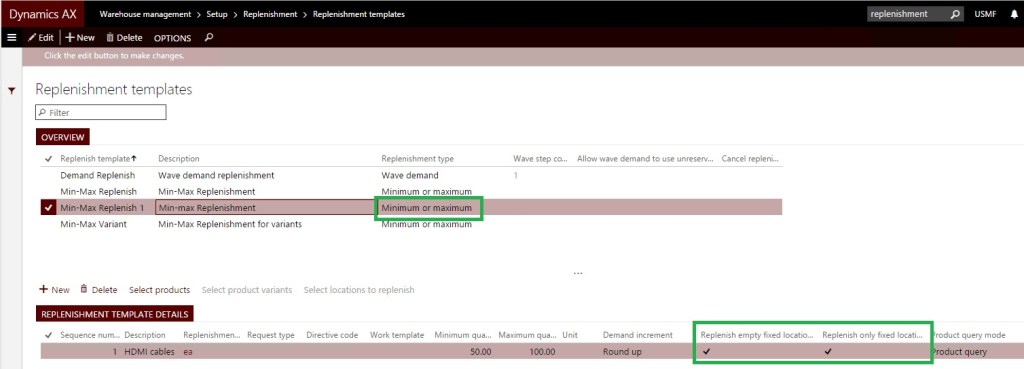
Replenishment template
Let’s take a look at the replenishment setups. I have created a new replenishment template for this blog purpose for only A0003 item.
Replenishment template:
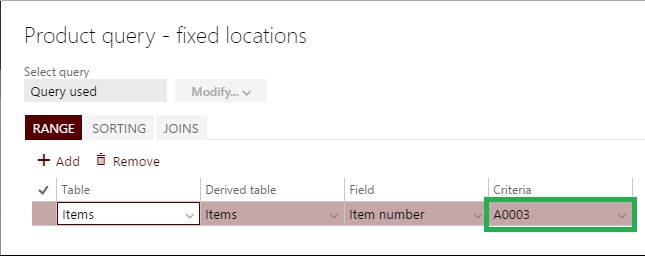
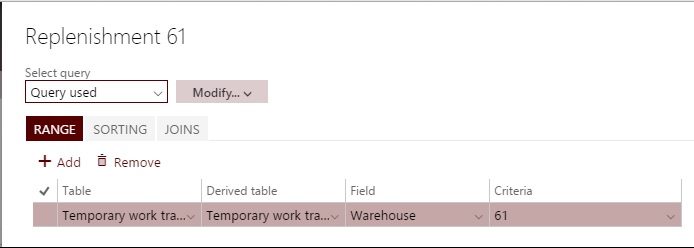
Here’s the query showing the Product selection for the above replenishment template.
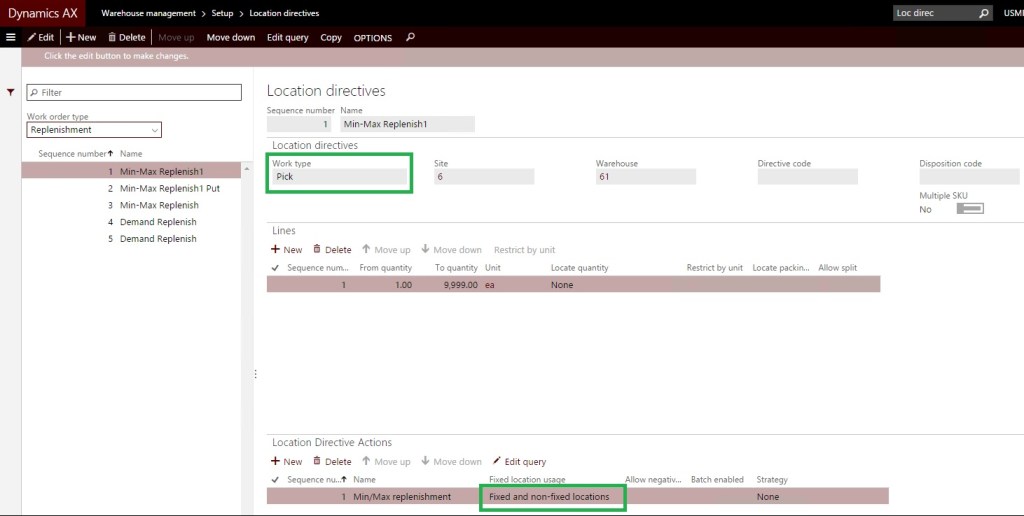
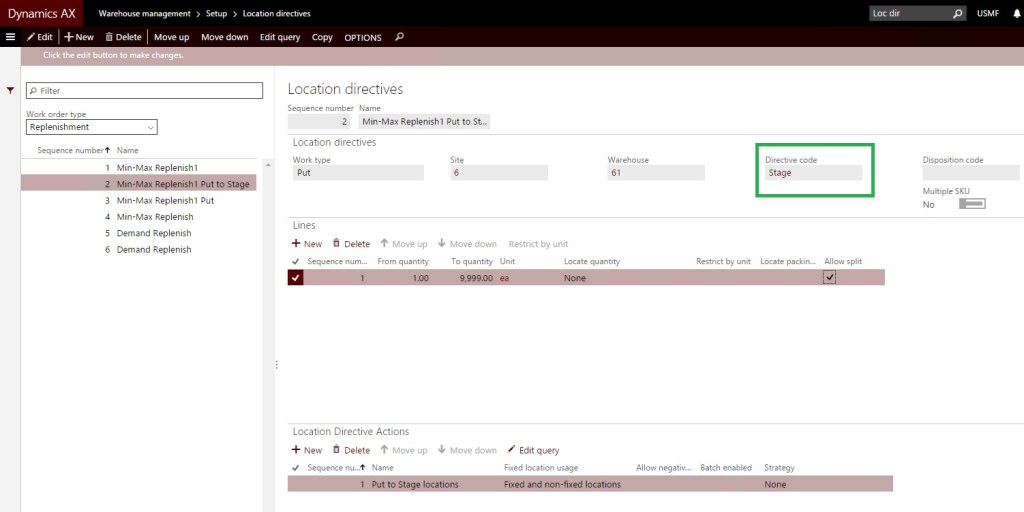
Location directives
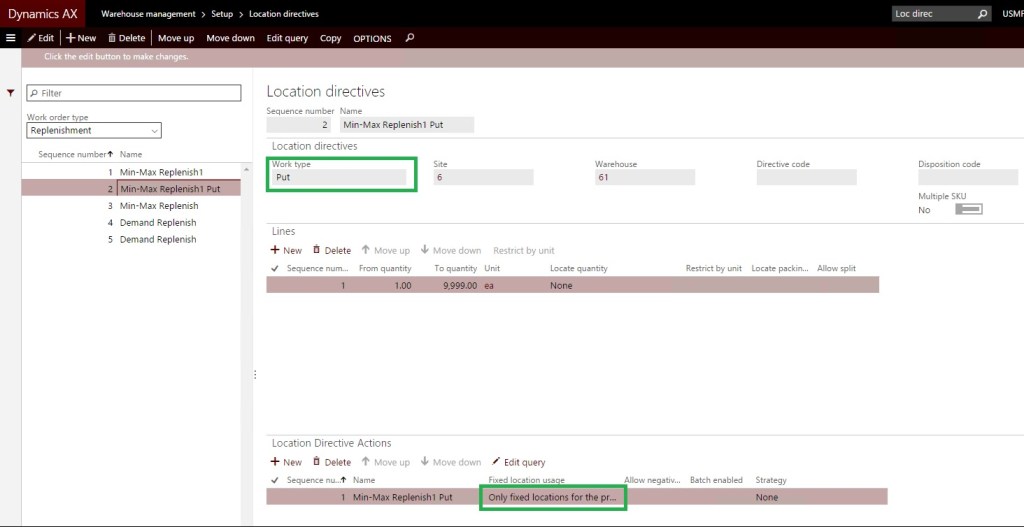
Location directives using this replenishment template can be seen below:
Location directive for Pick Work type:
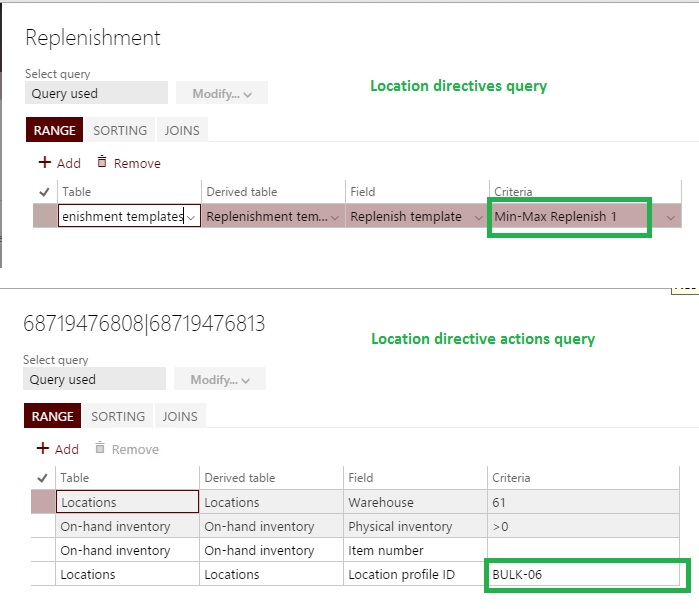
Here are queries for the Location directives and Location directive actions:
Location directive for Put Work type:
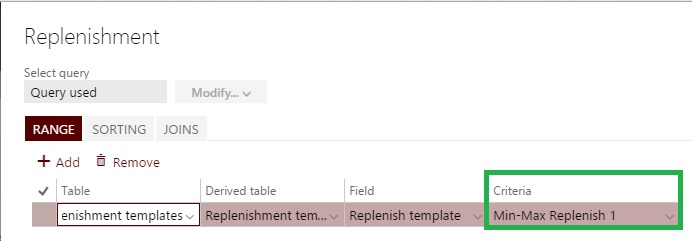
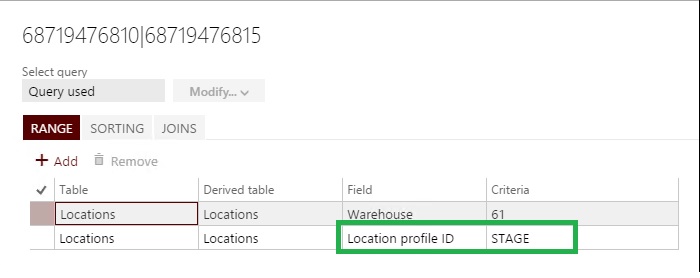
Query for the Location directive:
There is no need to add a query for Location directive actions as we are using ‘Only fixed locations for the products’ in a Fixed location usage.
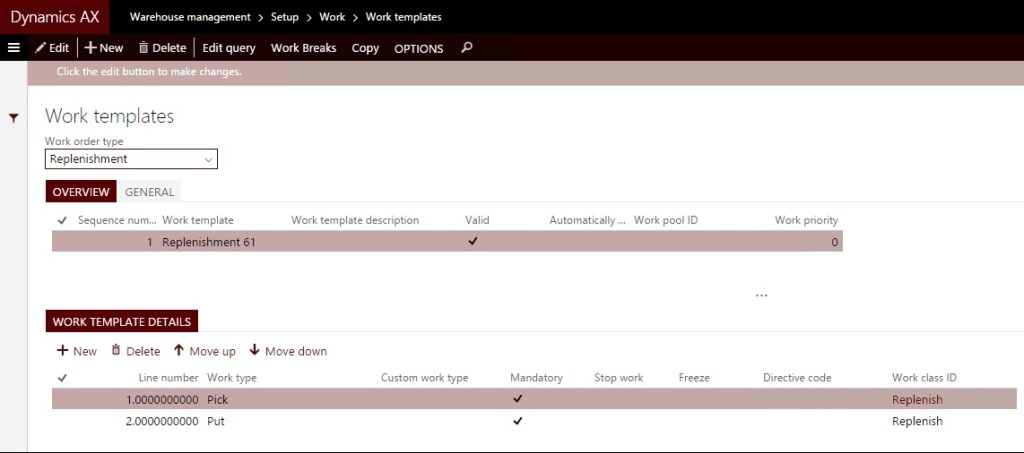
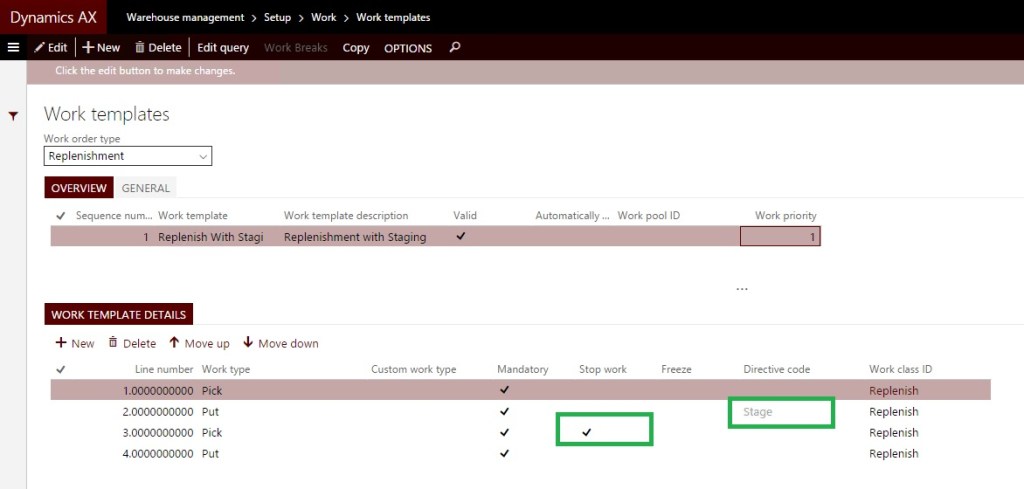
Work template
Work template for replenishment has been setup as below:
Query for the Work template:
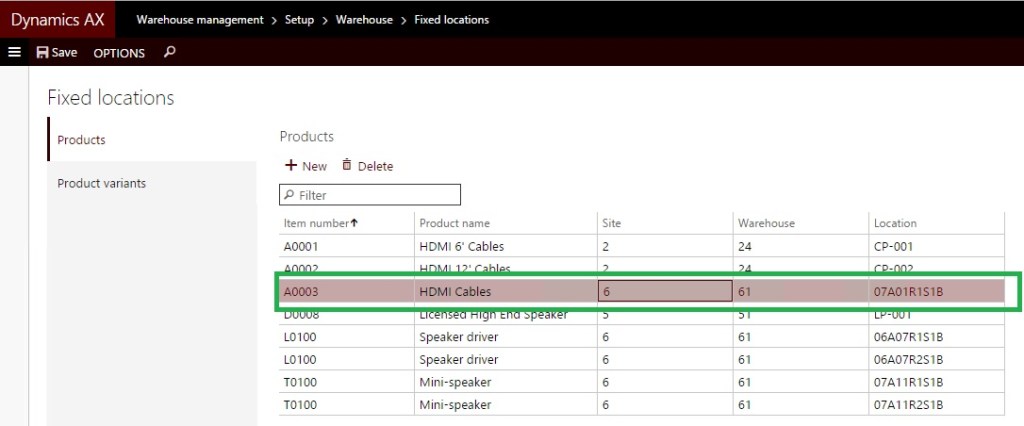
Fixed location has to be specified for the product since I chose ‘Only fixed locations for products’ in Location directive actions.
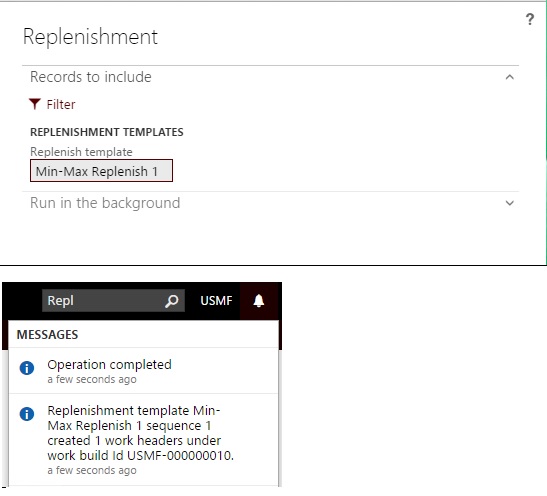
Replenishment job
Run the replenishment job choosing the replenishment template created above. You can see the Work creation message in the notifications.
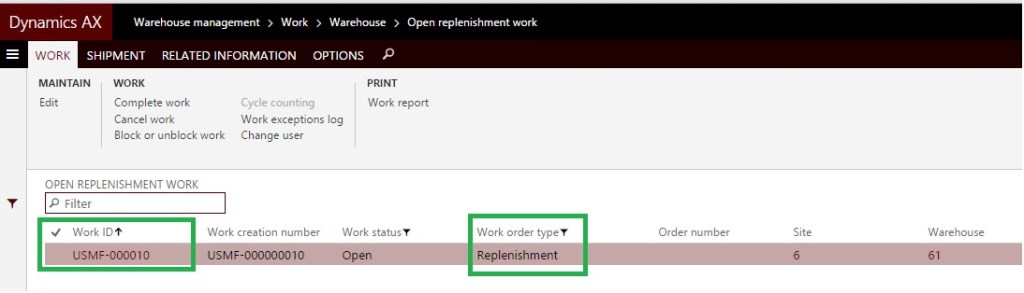
Replenishment Work creation
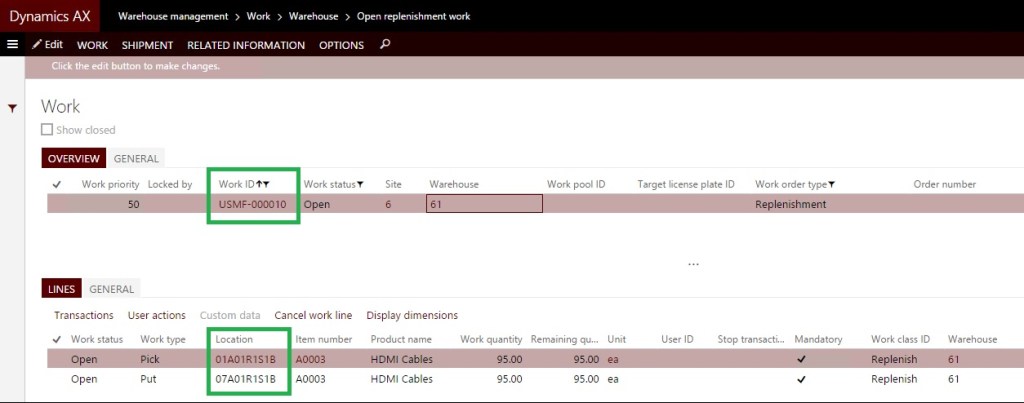
Navigate to Open replenishment Work to check the Work created by the above job.
Replenishment from multiple bulk locations
This is the case where the product to be replenished exists in multiple bulk locations in the warehouse. Say below is the inventory on-hand situation for the product.
On-hand situation
Fixed location has 5 on hand, while multiple bulk locations have different quantities summing up close to what needs to be replenished.
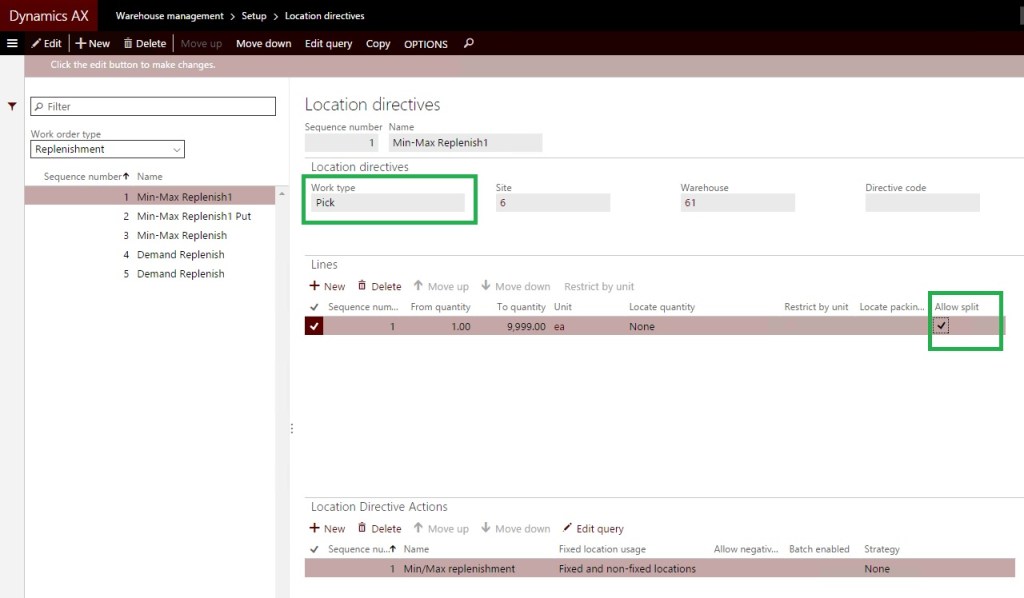
Location directive changes
The only difference from the above setups to achieve this is that the Location directive should have the below change:
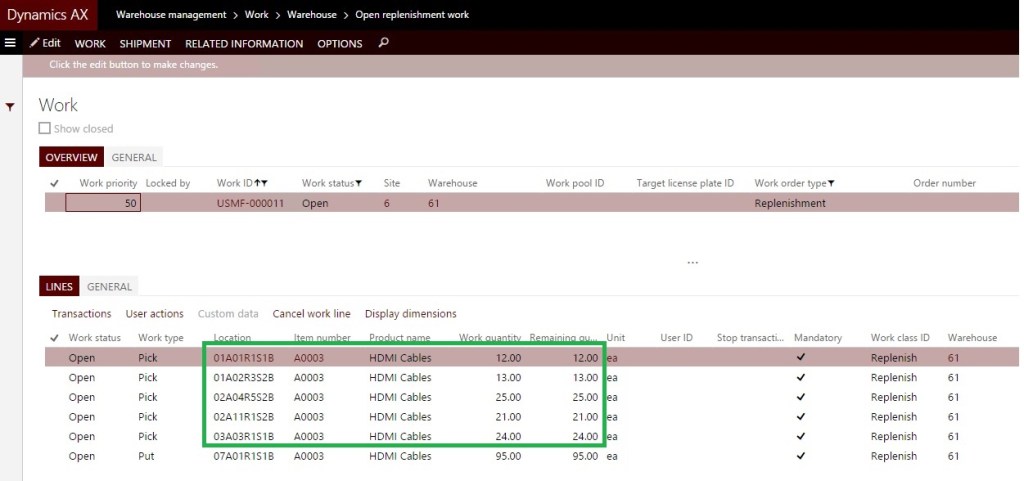
Replenishment Work with multiple picks
When you run the replenishment job for this template, you get the below results:
Staging in Replenishment
In warehouses, generally replenishment users wants to put all their Work in staging and then transfer to picking locations at a later point. This might involve one user performing picking from bulk locations and putting it into a staging location. Another user can perform the Work of picking from a staging location and putting it into picking locations.
Let’s say we continue the above scenario of picking from multiple bulk locations to replenish into the picking location. The only changes that need to be done in the above setups are in:
Location directives (Put Work type), and
Work template
Location directive changes
Add a Directive code in the Location directive. We will be using this Directive code in the Work template.
Location directive actions query is as shown below. The other query remains the same as in the first and second scenario.
Work template changes
Work template should have two pairs of Pick and Put.
Replenishment Work with Staging
Work created with these settings looks like the below when the replenishment job is run. Two pairs of Pick and Put are created in the Work. The first pair is for picking from bulk locations and putting it into a staging location. The second pair is for picking from a staging location and putting it into a picking location.
Project management involves understanding a wide variety of topics—from people management to strategy, number crunching to IT to communications. All these disparate aspects of a business come with their own tools. In this article, we’ll take a look at some of the most important items in a project manager’s planning toolkit to help plan, monitor progress, identifying critical paths, and other tasks required for a project to run smoothly.
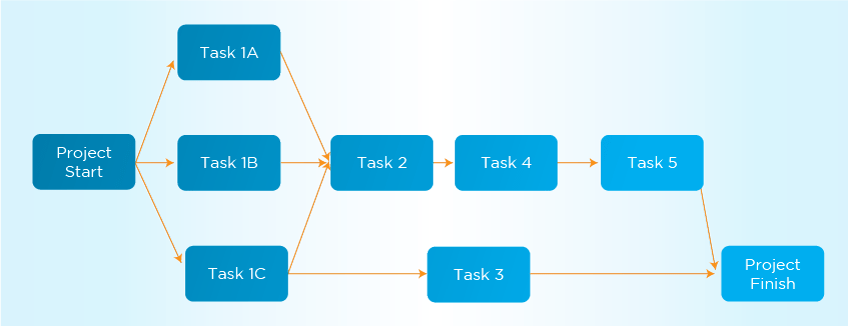
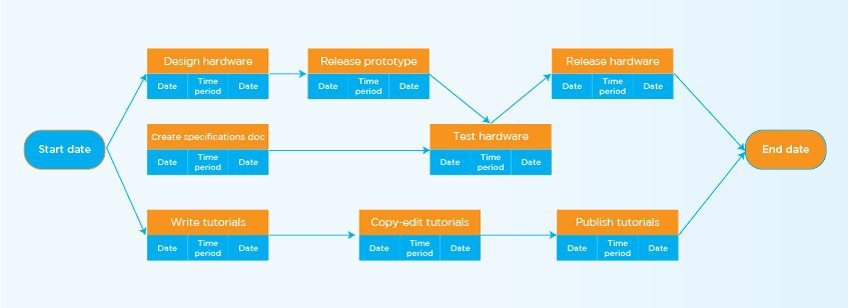
Network Diagrams
Network diagrams are one of the project management tools a project manager uses for project planning. It is also sometimes referred to as an “Arrow” diagram because it uses arrows to connect activities and represent precedence and interdependencies between activities of a project.
There are some assumptions that need to be made while forming the Network Diagram. The first assumption is that before a new activity begins, all pending activities should have been completed. The second assumption is that all arrows indicate logical precedence. This means that the direction of the arrow represents the sequence that activities need to follow. The last assumption is that a network diagram must start from a single event and end with a single event. There cannot be multiple start and endpoints to the network diagram.
In order for the network diagram to calculate the total duration of the project, the project manager needs to define four dates for each task. The first two dates relate to the date by when the task can be started. The first date is Early Start—this the earliest date task can be started. The second date is Late Start—this is the last date the task should start.
The second two dates relate to the dates when the task is complete. Early Finish is the earliest date by when the task can be completed, while Late Finish is the last date by when the task should be completed. The Duration of the task is calculated as the difference between the Early Start and Early Finish of the task. The difference between the Early Start and Late Start of the task is called the Slack time available for the task. Slack can also be calculated as the difference between the Early Finish and Late Finish dates of the task. Slack time for a task is the amount of time the task can be delayed before it causes a delay in the overall project timeline.
Critical Path Method
Critical Path Method, or CPM, is an important project planning tool used by project managers to monitor the progress of the project to ensure that the project is on schedule. The Critical Path for a project is the longest sequence of activities on the network diagram and is characterized by zero Slack for all activities on the sequence. This means that the smallest delay in any of the activities on the critical path will cause a delay in the overall timeline of the project.
This makes it very important for the project manager to closely monitor the activities on the critical path and ensure that the activities go smoothly. If needed, the project manager can divert resources from other activities that are not on the critical path to activities on the critical path to ensure that the project is not delayed. When a project manager removes resources from such activities, he needs to ensure that the activity does not become a critical path activity because of the reduced number of resources.
During the execution of the project, the critical path can easily shift as a result of multiple factors and the project manager should constantly monitor it. A complex project can also have multiple critical paths at the same.
Program (or Project) Evaluation and Review Technique
The Program (or Project) Evaluation and Review Technique, commonly abbreviated as PERT, is a form of the Network Diagram project management tools we just discussed. PERT is also used for identifying the critical path for the project. This technique was developed to simplify planning and scheduling large and complex projects and creating more realistic estimates of the duration of each activity. While the standard Network Diagram uses one estimate for the duration of each activity, PERT involves three kinds of estimates for each activity.
The first estimate is an optimistic estimate represented as to (pronounced T-O). The optimistic estimate considers all factors that affect the activity to go in favor of the activity. For example, optimistic estimates will assume that no issues are encountered during the activity and all resources perform at their highest efficiency levels. Optimistic estimates are therefore slightly less than other estimates.
The second estimate is called the “most likely” estimate and is represented as tm (pronounced as T-M). This estimate assumes that the activity will encounter some issues during execution and provides for some contingency buffers in the estimate. The third estimate is the “pessimistic” estimate and is represented as tp (pronounced as T-P). This estimate assumes that whatever that can go wrong will go wrong during the execution of the activity. This estimate, therefore, includes large contingency buffers and is the highest amongst all the three estimates.
The realistic estimate for the activity is represented as te (pronounced as T-E) and is calculated by taking an average of all the three estimates. While calculating the average the “most likely” an estimate is assigned a weight of 4 whereas the other two estimates are treated as is.
The final realistic estimate calculated using PERT takes much more time to calculate but is much more realistic than estimates calculated without PERT.
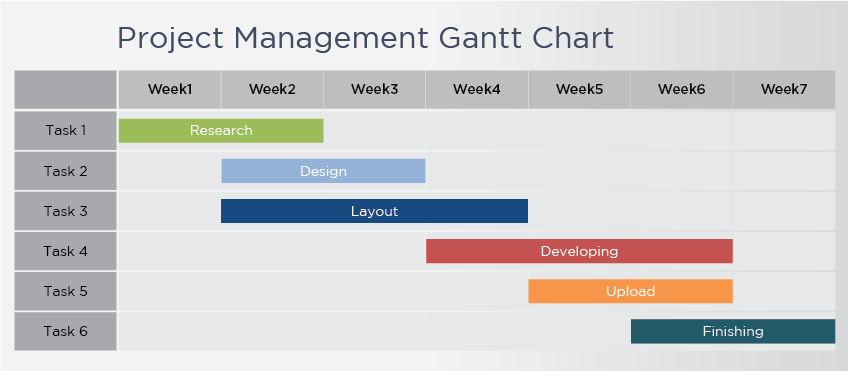
Gantt Chart
Developed by Henry Laurence Gantt in 1910, the Gantt Chart provides a graphic schedule for planning and controlling the project and recording progress towards completion of various activities in the project. It’s a great project planning tool since it represents the project schedule as bar charts spread out over a timeline. The progress of each activity is indicated in a separate color from the planned duration of the activity. The difference in colors and the length of the bar chart helps project managers identify delays or schedule overruns in the project.
Gantt charts help in representing a large amount of information in a compact graphical form.
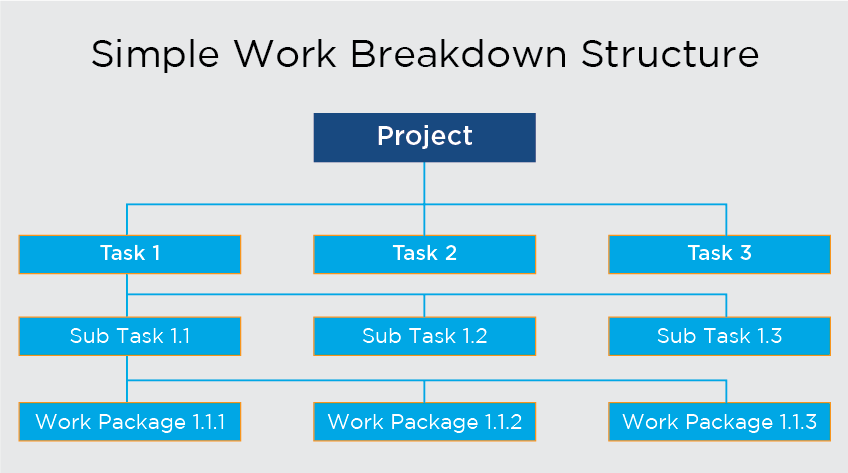
Work Breakdown Structure
A Work Breakdown Structure, also called WBS, is a delivery oriented hierarchical decomposition of work. It is often used as a project planning tool to define the total scope for the project and to identify required deliverables for the project. Having detailed project deliverables enables all stakeholders to get a common understanding of the project scope—each team knows exactly what needs to be developed.
WBS divides each project deliverables and project work into smaller more manageable components. Items at the lowest level of the WBS are called Work Packages. A work package can be scheduled, cost estimated, monitored and controlled individually. Breaking up a large project into smaller work packages enables the project to be better planned, tracked and managed.
Project Documentation
Project Documentation refers to creating documents that provide details about the project. Such documents are used to gain a better understanding of the project, preventing and resolving a conflict between stakeholders, and sharing plans and status for the project. Documenting a project is critical throughout all the phases of the project. Documentation serves as a written proof for the execution of the project, helping project teams achieve a common understanding of the requirements of the project and the status of the project.
Depending on the nature of the project, each project produces a number of different documents. Some of these documents include the Project Charter and Project Plan(and its subsidiary plans). Other examples of project documentation include Project Status reports including Key Milestones Report, Risks items, and pending action items. The frequency of these reports is determined by the need and complexity of the project; these reports are sent to all stakeholders to keep them abreast of the status of the project.
Conclusion
If you’re working toward your PMP certification, you know there’s a lot to learn. Understanding which tools to use along with when and how to use them is helpful not only for passing your exam but also for becoming a successful project manager in the future.
A successful project is indebted to an effective project team. How to get one is the major concern. Before going to that point, let’s understand what exactly a team is. A team comprises of a group of people linked in a common purpose for conducting task that are high in complexity and have many interdependent subtasks. A team often comes up generating ideas which is fruitful for the establishment of the project. A truly effective team will contribute to the personal well-being and adaptive growth of a project.
And now here the question lies, what is the key to build a good team which will ultimately lead to the growth and success of a project. There is no surefire recipe to build a good team, but there is surely lot many ways by which we can put our efforts to build one. It is not necessary that every member in a team is super skilled, rather it should be a mix of people who can complement each other’s skills. Besides, the main ingredient of a good team should be the right mix of trust, ambition and encouragement among team members. Also, there should be proper interaction and understanding among each other. The very first thing one needs to do in order to build an efficient team is to establish a defined objective based on which the team will put its effort to an effective point. Patience, involvement, dedication etc., are other major criteria to build up a good team. Besides, each team member’s experience works as a catalyst for building a strong and effective team.
Here are three crisp dos that one should know to make project team members work well.
1. Allotment of defined task Distribution of defined roles and responsibilities to team members is important. This will make them feel empowered. One feels responsible enough to carry out the task allotted to him/her and carries them efficiently as per his/her capability. This also helps a company to put forth an effective prospective. There might be employees who do not prefer to take responsibility and extra work. One need to find ways to keep such employees focused and motivated and try to get the best out of them as well.
2. Support and encourage the team members: It must be ensured that the team members should receive proper motivation and encouragement for their positive and active participation. This will have a significant effect on their performance and behavior. Encouraging or motivating people may also involve spending time and listening what people want and what people do not want. Team members should be given free hand at work and treated as a colleague and not a subordinate.
3. Make each member feel important: One should take care that each team member feel himself/herself as a part of the team. This will bring out active participation of the team members in a project. Promoting team bonding in any way possible will help the team to attain its prospective growth. You can make your team member feel important by actively trying to keep the work environment positive. One of the best ways to keep the employees motivated is by giving them rewards and promotions for their positive contribution towards the project.
Conclusion
Efficiency of a team doesn’t depend only on the team leader though he or she plays a major role in the smooth run of the project. A happy motivated team always performs well. People respond positively to positive behavior. No matter what type of project you are managing, you will always need the right team to support your efforts and ensure overall success.
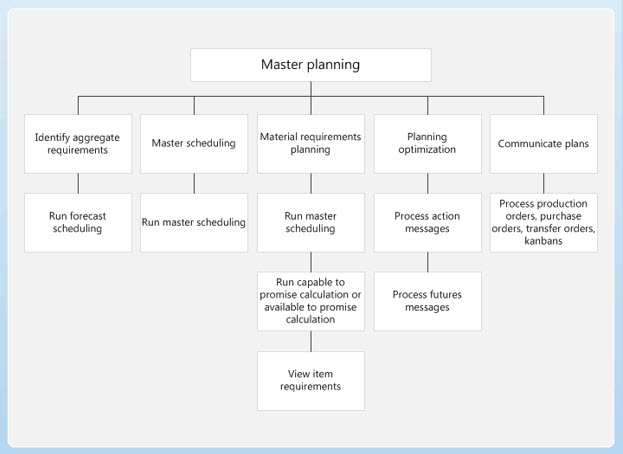
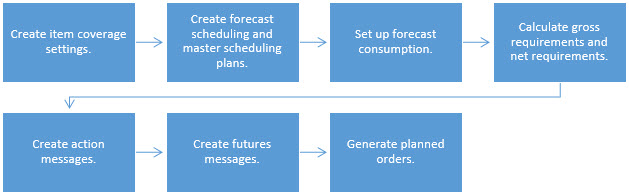
A good business outcome is the result of good planning. And when you have hundreds of things to manage, having a good planning tool is inevitable – not just to manage customer projects but also your day-to-day operations. Microsoft D365 for Finance and Operations master planning module enables you to efficiently manage all of your projects –set up and run the scheduling feature, calculate requirements and generate planned orders.
Dynamics AX offers a variety of master plans to support your company’s daily working operations. You can configure various plans on the Master Plans page, simulate different planning strategies, implement company policies, and manage a range of day-to-day tasks.
Forecast Scheduling: Want to efficiently manage your forecasts? With forecast scheduling, you can calculate gross requirements based on forecasts and perform long-term planning of materials and capacity.
Master Scheduling: Looking at carrying out planning based on actual orders? With master scheduling, you can calculate net requirements based on actual orders and control inventory replenishment on a day-to-day basis.
Static Planning: If you want to create an operating plan that your company personnel can use to base their decisions on and perform their daily tasks and activities, then the static plan is what you need. Using current data, you can generate a net requirements plan that remains unchanged until the next time you run master planning.
Dynamic Planning: If you want to continuously monitor the changing order network and item availability without disturbing the static plan that others are using for their work processes, you can use the dynamic plan. This plan starts with the same net requirements; however, you can update the dynamic plan every time the master data changes – say when you create a new sales order, for example.
You can choose to work with just a dynamic plan or you can use both static and dynamic plans. The point is, you can configure any master plan to reflect a particular strategy or address an issue: from setting higher inventory levels to ensure optimum stock, to configuring extended safety margins to safeguard against erratic vendors. You can also ensure that your dynamic plan is always updated with the new requirements plan every time you run master planning.
Configuring the Master Planning Module
The master planning module allows you to set up and run the scheduling feature to calculate requirements and generate planned orders. Calculate gross requirements based on forecasts, carry out long-term planning of materials and capacity, calculate net requirements based on actual orders, and control inventory replenishment on a day-to-day basis. In order to configure the master planning module, you need to:
Create safety stock journal names and set up basic rules
Create forecast plans and specify parameters
Create and manage master plans in the master plans form
Create coverage groups and set up parameters
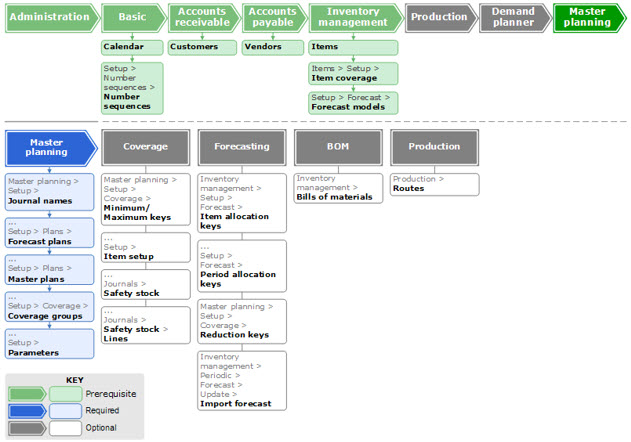
Pre-requisites
Before configuring the master planning module, you must set up:
The administration module
Calendar and Number sequences form in the basic module
Customers form in accounts receivable
Vendors form in accounts payable
Item details, item coverage, and forecast models in the inventory management module.
About Ravish Kazi
Ravish have over 18 years of experience in Business Solutions, Plant Management, Production Management, SIO Planning, Warehouse Operations, Supply chain Management, Project Planning & Control, Production Planning, Material Management, Demand Planning in Manufacturing Environment, He is Detail-oriented and highly articulate professional, directing operations and activities within production area – Employs strong organizational skills, leadership and thorough knowledge regarding many aspects of the production process to achieve organization goals: MRP, MSP, Forecasting, cost estimates, cost-savings, product quality, labor efficiency, timely delivery and safety. Excellent hands on experience in Implementing Microsoft Dynamics D365/AX ERP System via Scrum framework and through understanding of Inventory Management, Advanced Warehouse Management, Production Control, Project Management & Accounting, Service Management, CRM, Procurement & Sourcing and Master Planning Module.
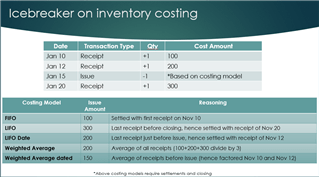
Inventory costing plays a significant role in knowing the true financials of an organization and is quite a comprehensive topic. This post is share knowledge about various costing options, however their fitment to the business model, industry vertical, compliance, etc. requires a detailed exercise, niche expertise and spans multiple domains cost accounting, financials, supply chain, etc.
Sharing insights on inventory costing models available in New Microsoft Dynamics AX and their behind the scenes calculations:
FIFO
LIFO
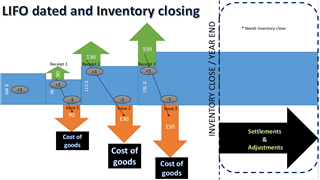
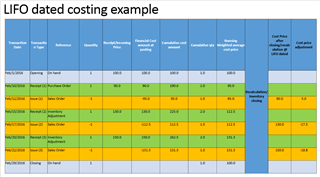
LIFO dated
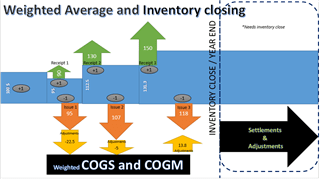
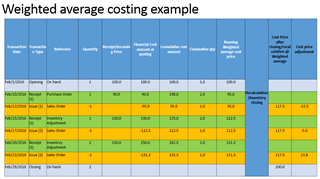
Weighted average
Weighted average dated
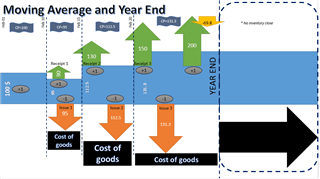
Moving average
Standard cost
Following costing methods need closing for arriving at accurate cost as they need settlements between receipts and issues:
Following costing methods doesn’t need closing for arriving at accurate cost as there is no settlements:
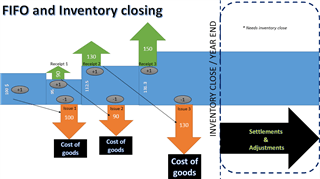
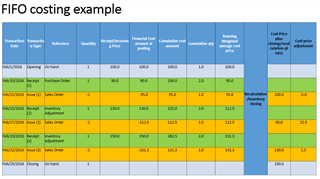
FIFO
FIFO inventory costing technique in simple terms is based on ‘First In First Out’ i.e. the first receipt is to be settled with the first issue transaction.
The example uses an opening inventory (Quantity = 1 and Value =100$)
Below is an example showcasing the date of transaction and it’s type (receipt/issue) and the running weighted average cost price until the inventory is revalued or closed to be assessed by the costing model.
The financial cost amount is posted when the transaction is financially updated (viz. Purchase order is invoiced)
Cost price using the costing model (FIFO) is like a virtual placeholder to post the adjustment between the running weighted average cost price and FIFO costing.
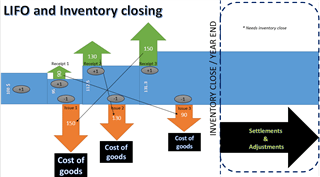
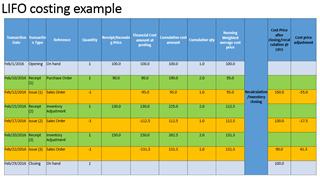
LIFO
LIFO inventory costing technique in simple terms is based on ‘Last In First Out’ i.e. the last receipt (at the time of closing) is to be settled with the first issue transaction.
The example uses an opening inventory (Quantity = 1 and Value =100$)
LIFO dated
LIFO dated inventory costing technique in simple terms is based on ‘Last In First Out’ date wise i.e. the latest receipt is to be settled with the issue transaction.
The example uses an opening inventory (Quantity = 1 and Value =100$)
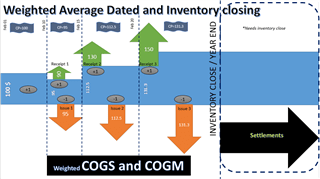
Weighted Average
Weighted average inventory costing technique in simple terms is a Periodic weighted average principle i.e. the issues are valued basis the average of the receipts during the inventory closing period.
The example uses an opening inventory (Quantity = 1 and Value =100$)
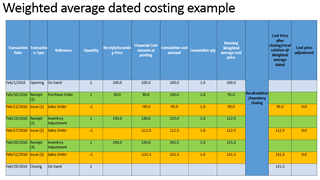
Weighted Average dated
Weighted average dated inventory costing technique in simple terms is a Periodic weighted average principle per day i.e. the issues are valued basis the average of the receipts for every day.
The example uses an opening inventory (Quantity = 1 and Value =100$)
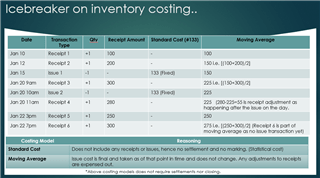
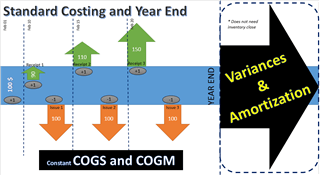
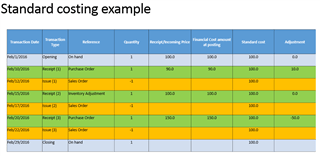
Standard cost
Standard costing technique in simple terms is a statistical and fixed cost approach i.e. the issues are always valued basis the active standard cost price on the item irrespective of the receipts.
The example uses an opening inventory (Quantity = 1 and Value =100$)
As standard cost does not require inventory closing to get the real cost as the cost is frozen upfront, any deviations in the input cost is posted as variances. Thus the adjustment entries are seen on the receipt type transactions.
Inventory closing for standard cost is not needed but the allocation of the variances captured must be amongst your planned task in the financial year end process.
Moving Average
Moving average technique in simple terms is a point in time cost method (perpetual type) i.e. the issues are always valued basis the point in time cost price on the item.
The example uses an opening inventory (Quantity = 1 and Value =100$)
The following list contains terms that pertain to manufacturing execution and related registration tasks:
Manufacturing execution – A function that is used to register time, material consumption, costs on production jobs, projects, and indirect activities. Registration is done in a manufacturing execution registration client.
Job list – On the Job registration page, workers are shown the list of jobs that they must perform on a specific resource, such as a machine. A worker can register time and item consumption on each job or task in the job list.
Job bundling – If a worker starts more than one job at the same time on the Job registration page, it is called job bundling. The time that is spent on bundled jobs can be allocated to the individual jobs in various ways by using allocation keys. This approach makes it possible to start multiple jobs at a time in the Job registration (Job list) page. If you bundle jobs, you must define how the total registered time for all the jobs should be allocated to each job. You can define the allocation by selecting one of the following options in the Bundle type field on the Allocation keys page:
Estimation – Time is divided between the jobs based on the estimated time for the jobs.
Jobs – Time is divided according to total jobs bundled and how much time was spent finishing all the jobs.
Net time – Time is divided equally between the jobs that are in the bundle at any time.
Real time – Actual job time is allocated. The cost can be calculated based on the actual payroll cost.
Pilot/assistant registrations – A worker can register as an assistant to a resource and can create a small team where several people work on the same production jobs. Resources that workers are connected to as assistants are called pilots. Only the pilot resource must make registrations. All assistants automatically get the same registrations. For example, if a machine acts as the pilot, workers who have registered as assistants to that machine can make registrations on the Job registration page, and both the machine and the workers who are connected as assistants will receive the same registrations.
Indirect activity – An activity or task that isn’t directly related to a production job or a project, such as a department meeting, a cleaning job, or a maintenance job on the shop floor. Workers can make registrations on indirect activities in the same way that they can register on production jobs and projects.
Registration for manufacturing execution
Manufacturing execution is intended to be used primarily by manufacturing companies. Workers can register time and item consumption on production jobs by using the Job registration page. All registrations are approved and are later transferred to the relevant modules. Continuous approval and transfer of registrations lets managers easily track actual costs on production orders.
Production parameters in Manufacturing execution
Before you start to use Manufacturing execution for job registrations, you must set up various production parameters that define how and when registrations are posted during the production process. The settings of production parameters affect inventory management, production management, and cost calculation.
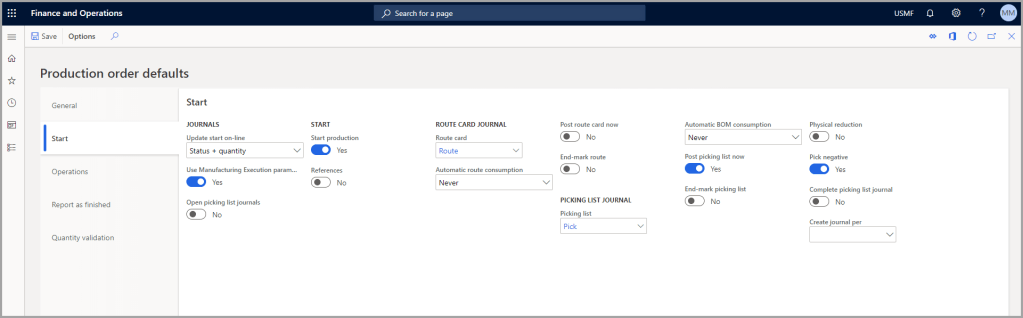
Before workers start to make registrations on production jobs, you should carefully consider all settings on the Production parameters page. To go to the page, select Production control > Setup > Manufacturing execution > Production order defaults.
If your company uses the multi-site functionality, you might want to set up different production parameters for each site. The parameters for integration with the Production module are set up on the following tabs on the Production parameters page:
General – General parameter settings for production jobs in Manufacturing execution.
Start – Parameters that are used when production operations are started.
Operations – Parameters that are applied to production operations and feedback about operations during the production process.
Report as finished – Parameters that are used when items are reported as finished on the last operation of a production order.
Quantity validation – Parameters that are used to validate startup and feedback quantities on production orders.
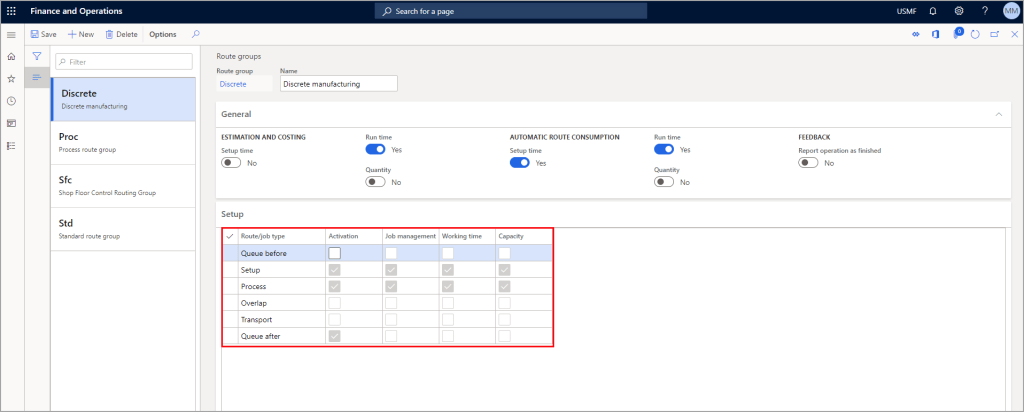
Types of production jobs
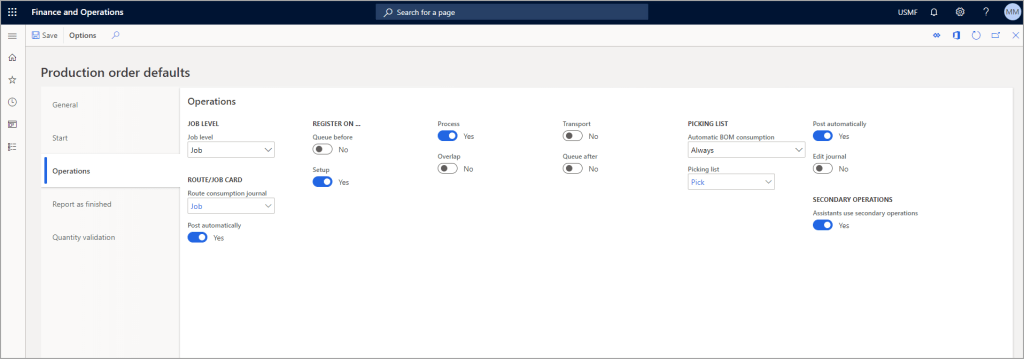
On the Operations tab, you can select which types of production jobs that require registration on the Job registration page.
Typically, workers make registrations on setup jobs and process jobs. However, if job scheduling is applied, you can select other job types that workers must make registrations on when production orders are processed. For example, you can require registrations on transport jobs.
Make sure that you select all relevant job types. Otherwise, jobs might not be available for registration on the Job registration page. Your selections should match the selections in the Job management column on the Setup tab of the Production control > Setup > Routes > Route groups page.
If Job management is selected on the route group, this job type is reported as finished on the production order when the job is reported as finished in Manufacturing execution. When all job types that Job management is selected for have been reported as finished on an operation, Manufacturing execution reports the operation as finished. Some job types can be manually reported through production journals.
BOM consumption and picking list journals
A consistent setup for bill of materials (BOM) consumption is important because it helps guarantee that inventory management is efficient. For example, if BOM consumption parameters aren’t set up correctly in Manufacturing execution, materials might be deducted from inventory twice or not at all.
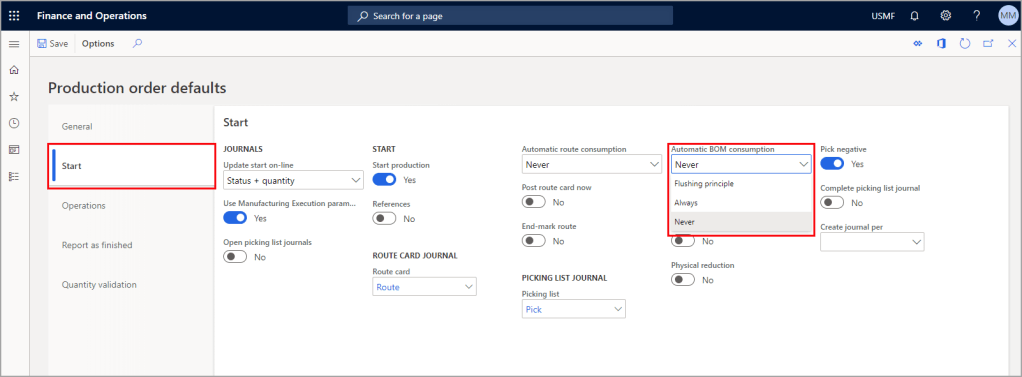
On the Production order defaults page, automatic BOM consumption is set up in three stages:
At the start of a production. Set up this stage on the Start tab.
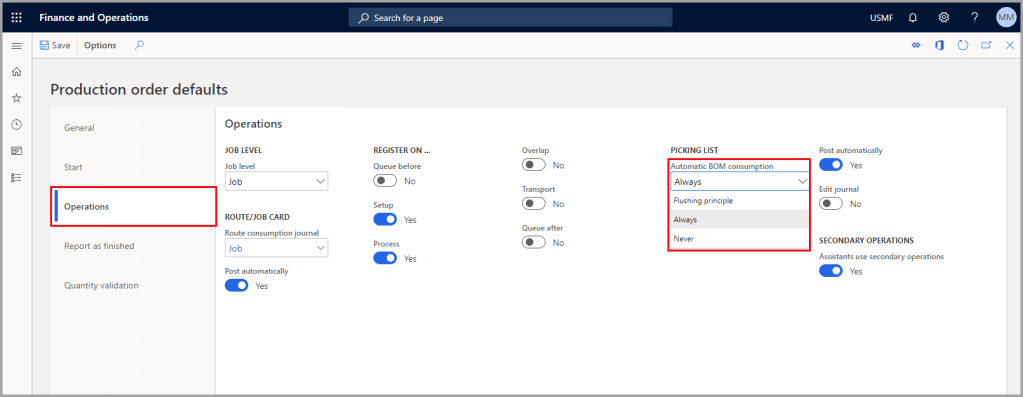
During the production process, when an operation is completed. Set up this stage on the Operations tab.
When a production order is reported as finished. Set up this stage on the Report as finished tab.
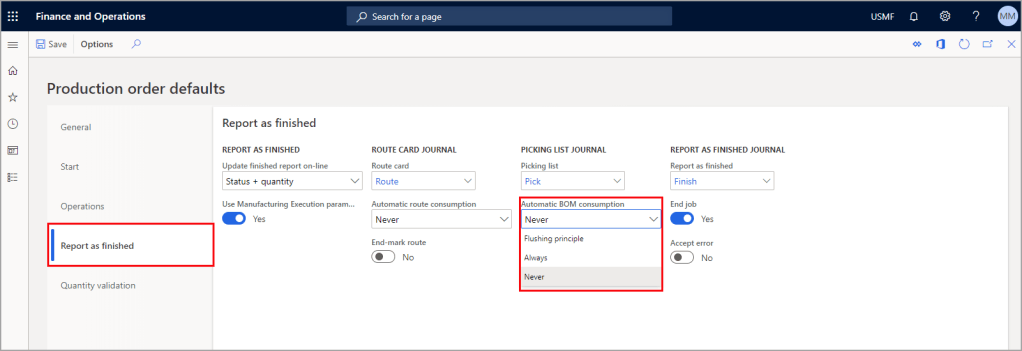
Go to Production control > Setup > Manufacturing execution > Production order defaults and select the Report as finished tab. For each stage, the Automatic BOM consumption field lets you select one of three methods for picking items for a production order:
Flushing principle – This option is used in combination with an option that is defined for the BOM in the Production module. If Flushing principle is selected in the Automatic BOM consumption field on the Start tab, all materials that are set to Start in the BOM are deducted from inventory when the operation is started. The Available at location option is used for products that are enabled for advanced warehouse processes. If you select this flushing principle, material is flushed when warehouse work for raw material picking is completed. Material is also flushed when a BOM line that uses this flushing principle is released to warehouse and the material is available at the production input location. If the Flushing principle field is set on the Start tab, you must select the same principle on either the Operations tab or the Report as finished tab. This requirement helps guarantee that materials are deducted from inventory on BOMs that use the Finish as a flushing principle on the production order. If the same flushing principle isn’t selected on either the Operations tab or the Report as finished tab, materials might be deducted from inventory twice.
Always – If you select this option for a stage, materials are always deducted from inventory at that stage. For example, materials for the production are deducted when the production order is started. This setting requires that Never is selected on the Operations and Report as finished tabs. This requirement helps prevent items from being deducted from inventory twice.
Never – If you select this option for a stage, no BOM consumption occurs at that stage. For example, if you select Never on all three tabs (Start, Operations, and Report as finished), materials must be manually deducted from inventory.
Consider your setup of the production parameters, and make sure that the parameters that are selected on the various tabs of the Production parameters page don’t contradict each other.
Registrations in manufacturing execution
Workers can make various types of registrations in manufacturing execution for work that is performed on production jobs. Depending on the system setup, workers might also be able to make registrations on project activities and nonproductive tasks, such as breaks, absences, and indirect activities. The following are the registration types:
Clock-in/clock-out (available with time and attendance) – Workers clock in when they arrive at work and clock out when they leave to go home.
Register on production jobs – Workers can make registrations, such as starting a job and reporting feedback for a job, on the production jobs that appear in their job list. Workers can start several jobs at the same time, which is referred to as job bundling.
Register on inventory – Workers can make registrations on materials that are used on the shop floor but that aren’t directly related to production jobs. Examples include grease, lubricants, or other materials that are used to keep machinery running. Registration is performed in an inventory journal.
Register on projects (available with time and attendance) – Workers can make registrations, such as starting and finishing work on the projects or project activities that appear in their job list.
Register project fees and project items (available with time and attendance) – Workers can register fees (expenses) that are associated with a project in a project fee journal, such as mileage and bridge toll. Workers can also register item consumption on projects. This task is done in a Project item journal.
Register as assistant to another worker – If two or more workers will work together on a production job or a project, a worker can register as an assistant to a machine or to another worker, who will then act as the pilot. The pilot can select another worker as the pilot, as required.
Register absence (available with time and attendance) – Workers can register time on various absence codes that are set up. Absence can be indicated if a worker arrives late, requires absence during the work day, or leaves earlier than expected according to the standard work time profile.
Register breaks (available with time and attendance) – During the work day, workers can register that they are leaving their workstation to take a break. Several break types can be set up. When a worker returns and signs in again, the system registers that the worker is back, and the break registration stops.
Register indirect activities (available with time and attendance) – Indirect activities are nonproductive activities that workers might engage in during a workday, such as a department meeting, a team meeting, or a maintenance job that is performed on the shop floor. Workers can make registrations on the indirect activities that are set up.
Register overtime (available with time and attendance) – Workers who have been asked to work longer hours can select whether the extra hours should be registered as flextime or overtime.
You can schedule production at the operation level and the job level. Scheduling at the operation level is the less detailed method and provides a general estimate of the production process over time. Operations scheduling does not explode the operations for the production route into jobs.
If you want to include more detail in the scheduling, such as information about current capacity, you can run job scheduling after operations scheduling. You can also run a job scheduling only. Job scheduling is typically used to schedule individual jobs on the shop floor for an immediate or short-term time frame.
The main components of operations scheduling are the scheduling direction, the capacity of resources, and materials optimization. By using operations scheduling, you can:
Control the planning method by scheduling forward or backward from a given date.
Optimize the use of resources by scheduling productions based on the capacity of the resources. This approach also helps identify when to use alternative resources.
Optimize the use of materials by scheduling productions based on the availability of the required materials.
Schedule and synchronize reference productions. The dates of the reference productions are adjusted when changes are made to the production order’s schedule.
Before running operations scheduling, you must estimate the cost of a production order. If you have not run an estimate, it is run automatically before the operations scheduling process is initiated.
Job scheduling is a more detailed form of scheduling than operations scheduling. You can use job scheduling to schedule individual jobs or shop orders and to control the manufacturing environment. It breaks down each operation into individual tasks or jobs. These jobs are then assigned to the operations resources that will perform them.
Job scheduling also enables you to synchronize all jobs that are referenced by the selected job. You can specify a starting date and time or finishing date and time for the job, and then run scheduling. The time that you specify can be the starting time or the finishing time depending on the scheduling direction. This approach is useful, for example, when a job can be run only on one machine at a time, or to optimize the job that is run for each resource.
The job scheduling process includes the following tasks:
Split operations into jobs.
Schedule jobs that are based on the dates and times for the resources that are specified for the related operation.
Calculate starting times and ending times for each job. You can use finite capacity to make sure that there are no overlapping times.
Determine which resources in the resource group to run the job on. To make this determination, a resource group must be specified for an operation. Job scheduling selects the resources or resource groups based on the shortest lead time and considers any previous reservations on the resources.
Explode operations into jobs when you run job scheduling. The jobs are scheduled by date and time according to the order that is specified by the production route. The setup of the operation determines which jobs to explode during the scheduling process. The route group that is assigned to the operation controls whether jobs are generated. A job is generated only if it has a specific duration.
Manufacturing execution (ME) is about immediate insight into what happens, letting workers know what to do, and about providing the required information to instruct and guide workers. Additionally, ME provides the ability to record costs, monitor performance, and trace the history of production, which is critical to the manufacturing execution process.
Manufacturing execution is primarily intended for use by manufacturing companies. Workers can register time and item consumption on production jobs and project activities by using the Job registration form.
All registrations are approved and subsequently transferred to the relevant Dynamics 365 Supply Chain Management modules. Continuous approval and transfer of registrations give managers the ability to easily track actual costs on production orders.
Manufacturing execution serves several purposes in a manufacturing company, including:
Resource management – Includes the basic information about the resources (tools, machines, workers, or vendors) and their capacity, capabilities, and requirements. The goal is to schedule and process production orders with resources that have the correct capabilities and availability.
Production scheduling – The scheduling process uses all the information that is available from resources and the inventory and master planning sub systems to determine how much to produce and then how to make optimal use of the available resources to meet the demand requirements.
Production order processing – Although the actual implementation of the production order is completed in the Production control module, ME integrates with the Production control module to provide the details about the time and materials that are consumed for specific jobs or operations.
Performance analysis and tracing – ME tracks the detailed status of a production order. This analysis and tracing is useful in providing accurate work-in-progress (WIP) information, resource performance statistics, or other performance indicators. It also provides the ability to trace the complete history of the orders, batches, or serial numbers that are processed.
Several pages that are directly related to Manufacturing execution can be found in the Production control module. The following list includes several of these pages.
Production control > Manufacturing execution > Jobs and activities > Production job
Production jobs – Displays a list page with all the production jobs that are released to Manufacturing execution.
Project activities – Displays a list page with all the project activities that are released to Manufacturing execution.
Go to Production control > Manufacturing execution > Handle messages to create and manage messages that will appear on the Job registration page.
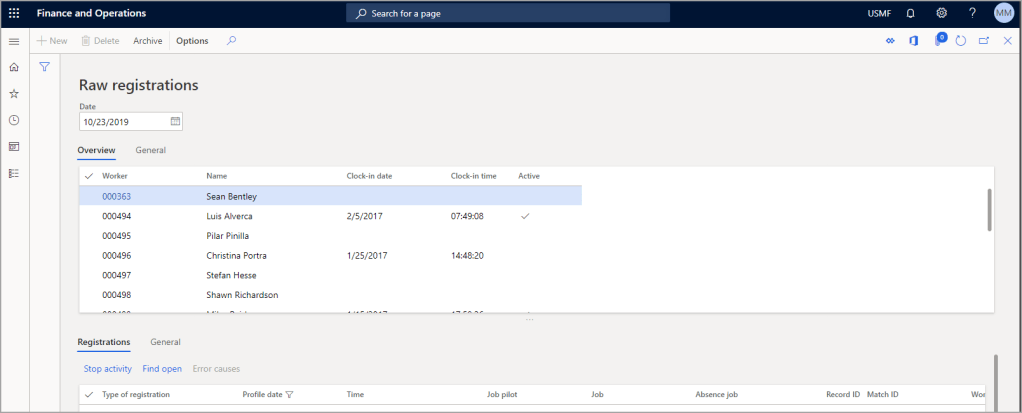
Production control > Inquiries and reports > Manufacturing execution > Raw registrations
Raw registrations – Displays a list of all registrations that are not archived.
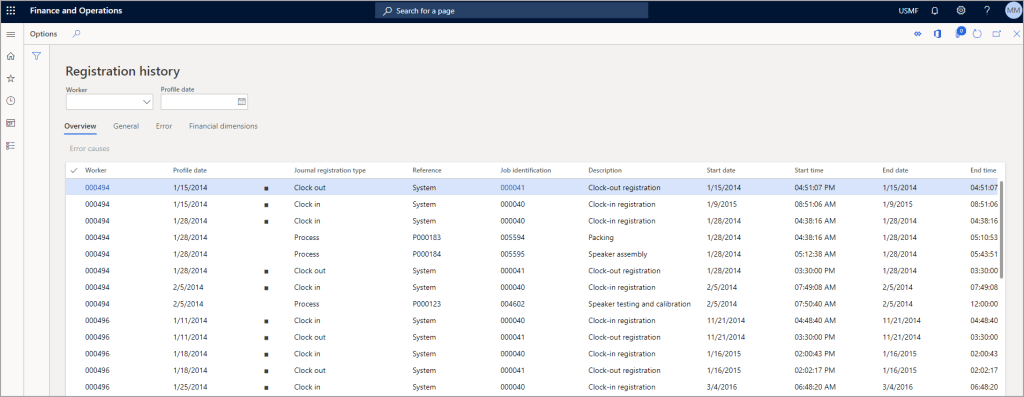
Registration history – Displays a list of registrations that have been modified and their details.
Posted registrations – Displays a filtered list of registrations that are approved and posted.
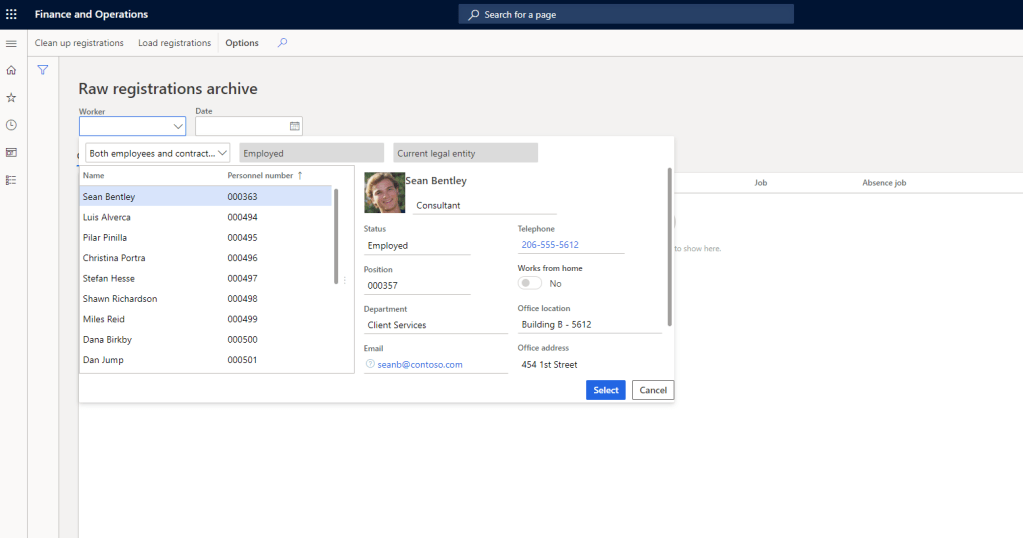
Raw registrations archive – Displays the list of registrations that have been archived.
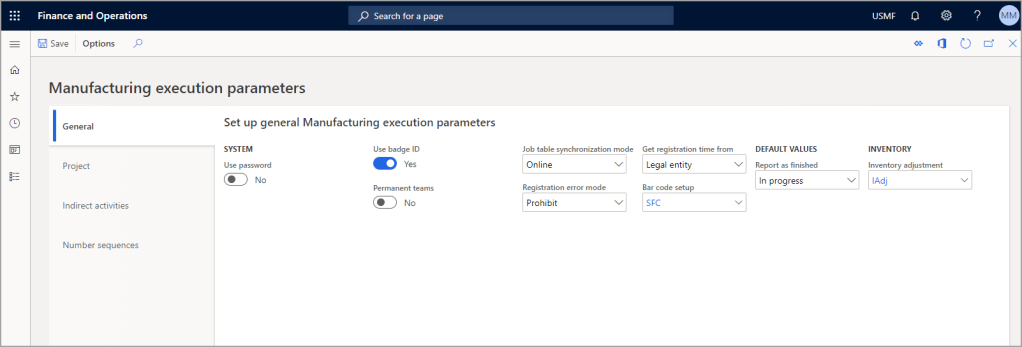
Production control > Setup > Manufacturing execution > Manufacturing execution parameters
Manufacturing execution parameters – Sets up manufacturing execution parameters in the Production control module.
Production order defaults – Defines parameters that integrate the Manufacturing execution features with the Production control module.
Production order defaults by site – Defines site-specific parameters that integrate the Manufacturing execution features with the Production control module.
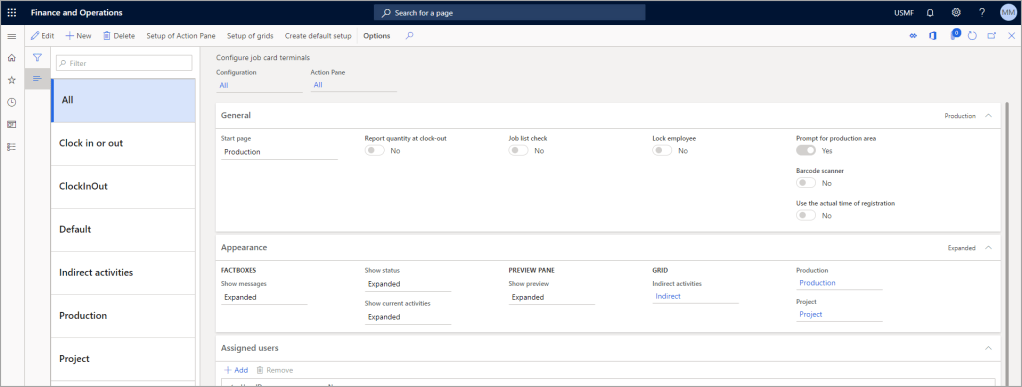
Configure job card terminals – Edits existing registration pages and configures new registration pages.
Configure job card for devices – Displays a list of existing devices. You can also use this page to change the parameters for a device.
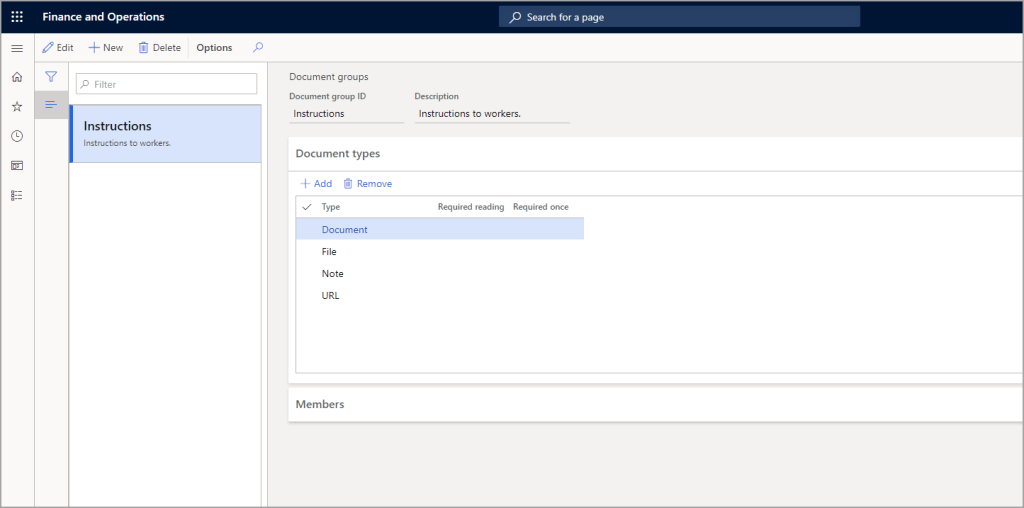
Production control > Setup > Document groups – Sets up document groups. The groups define which workers can read different document types.
Production control > Setup > Production > Allocation keys – Defines which allocation key to apply to packaged job registrations within a specific area.